リモート通知機能の使い方
2014/03/19 より Grade 1 のユーザーでも User to User のリモート通知機能が利用可能となりました。
2018/11/13 の Mobage Natie / Unity SDK 1.7.0 より 、 Android のプッシュ通知が GCM (Google Cloud Messaging) から FCM (Firebase Cloud Messaging) へ変更となりました。
2023/06/22 の Mobage Natie SDK for Android 1.12.0 より 、 リモート通知機能の初期化方法に変更がありました。
詳細はhttps://docs.mobage.com/display/JPSA/MobageNativeSDK_Android_ChangeLog_1.12.0 をご参考ください。
リモート通知は定型文のみの利用が可能です。
| SDK | Version |
|---|---|
| Mobage Native SDK | 1.7.0 |
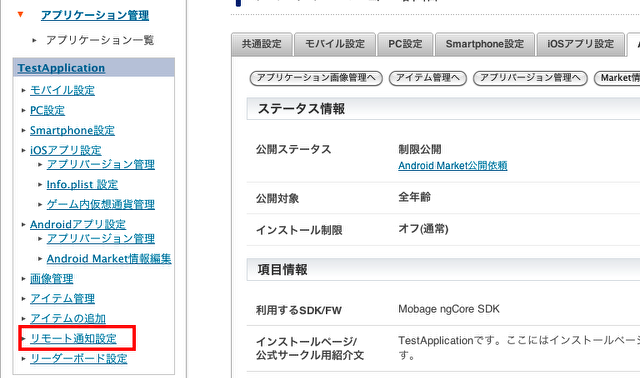
デベロッパーサイトでアプリケーション詳細よりAndroidアプリ設定もしくはiOSアプリ設定を登録することで、下図左下のようなリモート通知設定へのリンクが表示されますので、こちらをクリックします。
使用の際の注意点
- リモート通知機能は必ずユーザに通知が送信されるのを保証するものではないことをご了承ください。
- リモート通知機能の通知内容を、ユーザに自由に入力・編集させることを禁止します。そのためUser to Userの通知では通知内容を必ず定型文で構成してください。
iOS での設定方法
iOS の場合、下図のように APN 設定タブを選びます。
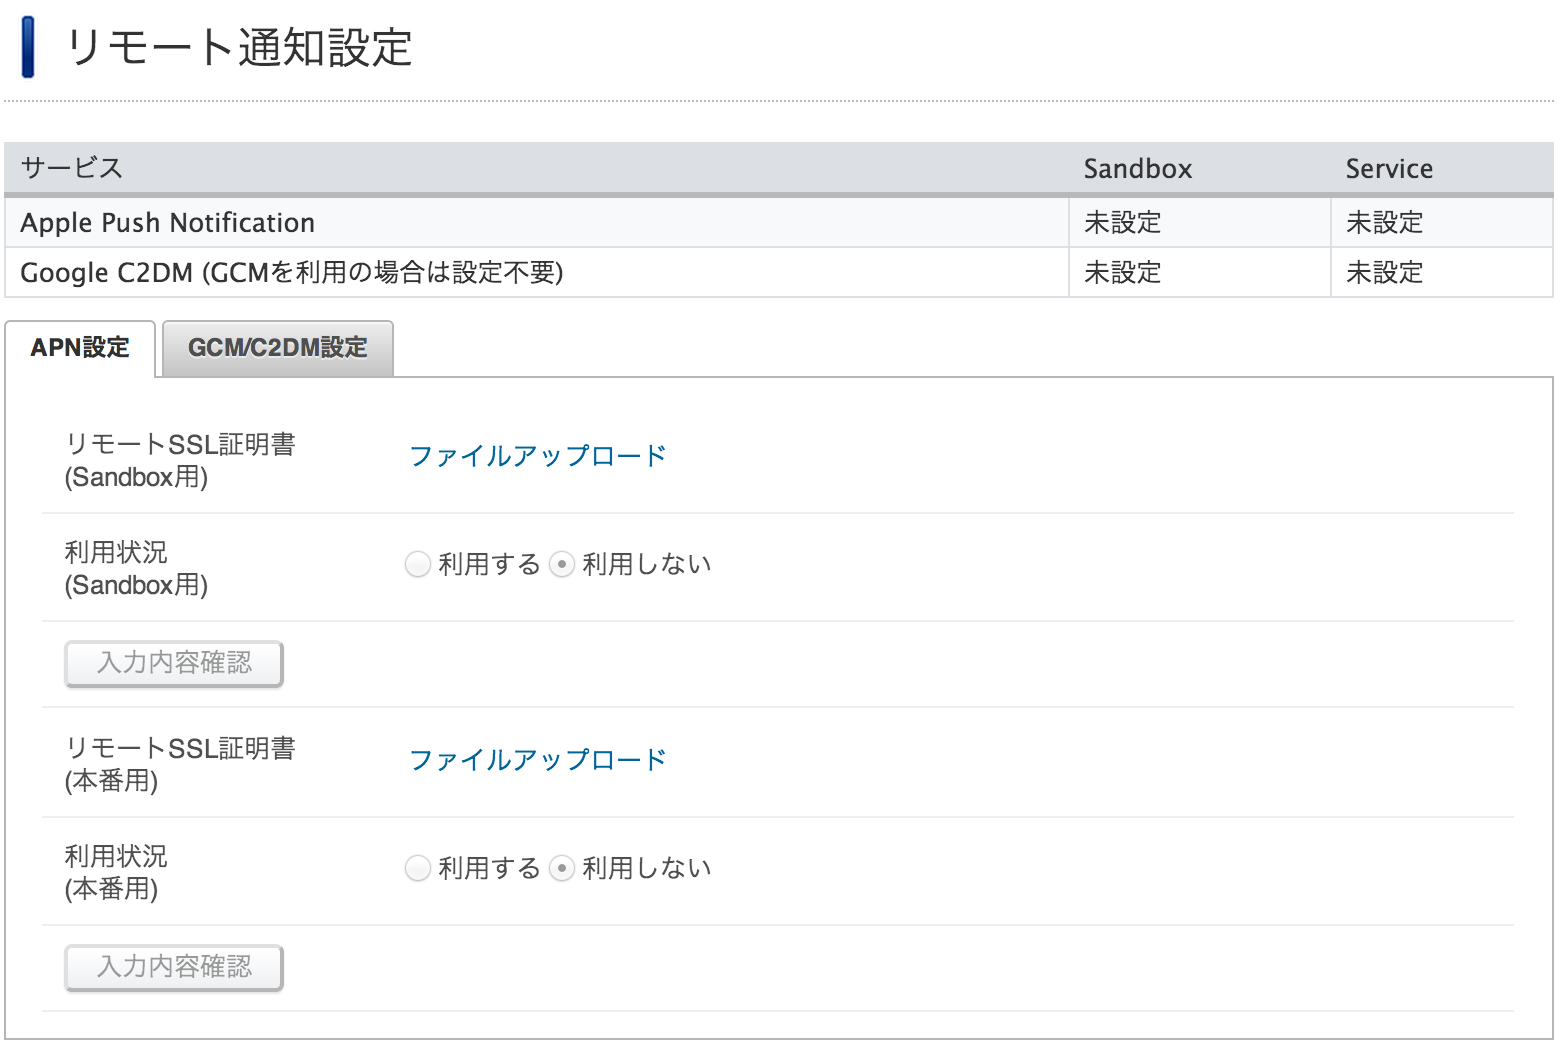
Sandbox用と本番用のリモートSSL証明書をアップロードすることができます。アップロードするファイルは.pemファイルとなります。
.pemファイルの作成方法につきましては下記を参考にされるか、こちら(日本語)をご確認ください。
- iOS Dev Center の iOS Provisioning Portal へアクセスします。
- 左側のメニューより、App IDs をクリックします。
- 既にアプリケーションを作成している場合には、対象の App ID をクリックし、展開された画面の『Edit』ボタンをクリックします。新規にアプリケーションを作成する場合には、右上の New App ID をクリックして、新規 App ID を作成後に対象の App ID をクリックし、展開された画面の『Edit』ボタンをクリックします。(新規 App ID 作成につきまして、詳しくは Topic 内の『iTunes Connect へのアップロード方法』をご確認ください)
- 画面内の『Push Notifications』をチェックします。
- Sandbox用は Development Push SSL Certificate の「Configure」ボタンをクリックします。本番用の場合は Production Push SSL Certificate の「Configure」ボタンをクリックします。 クリックすると、『About Creating a Certificate Signing Request (CSR)』画面が起動します。
- キーチェーンアクセスを起動し、以下の手順に従って CertificateSigningRequest.certSignningRequest を作成します。
- 上部メニューバーより、[キーチェーンアクセス]→[証明アシスタント]→[認証局に証明書を要求]をクリックします。
- [ユーザのメールアドレス]と[通称]を入力、[要求の処理]に「ディスクの保存」を選択し、「続ける」ボタンをクリックします。(CAのメールアドレスと、鍵ペア情報を指定のチェックボックスは空で結構です)
- 任意の保存先を選び、「保存」ボタンをクリックして CertificateSigningRequest.certSignningRequest を保存します。
- 『About Creating a Certificate Signing Request (CSR)』 画面に戻り、「Generate」ボタンをクリックします。
- 『Generate your certificate.』画面へ遷移しますので、「ファイルを選択」ボタンをクリックし、先程作成した CertificateSigningRequest.certSignningRequest を選択します。
- Your APNs SSL Certificate has been generated. と表示されますので、「Continue」ボタンをクリックします。
- 「Download」ボタンをクリックすると、証明書がダウンロードされます。ダウンロード後は右下の「Done」ボタンをクリックしてください。Push SSL Certificate の Status が Enabled になっていることを確認してください。
- ダウンロードした証明書をダブルクリックして、キーチェーンに登録します。
- キーチェーンアクセスの左下の「分類」より「証明書」を選択、登録した Apple Development IOS Push Servicesを選択し、メニューバーより、[ファイル]→[書き出す]で任意の場所に「個人情報交換ファイル(p12)」を保存します。書き出す際には任意のパスワードの設定が必要です。
- ターミナルから以下のコマンドで、「個人情報交換ファイル(p12)」を.pemファイルに変換します。
$openssl pkcs12 -in 証明書.p12 -out 証明書.pem -nodes
上記で作成した.pemファイルを、APN設定タブのリモートSSL証明書のリンクよりアップロードします。Sandbox用は Development Push SSL Certificate 、本番用は Production Push SSL Certificate をアップロードします。
アップロードすると、下図のような有効期間が表示され、利用状況と「入力確認」ボタンがアクティブになり、Apple Push Notification のサービスステータスが「利用不可」になります。
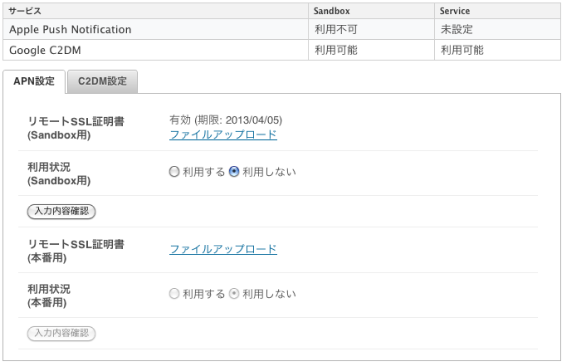
iOSのリモート通知機能を使用するためには、利用状況を「利用する」に設定し、「入力内容確認」ボタンをクリックします。入力内容確認画面の後、下図のように Apple Push Notification サービスステータスが「利用可能」になり、リモート通知機能が使用可能になります。
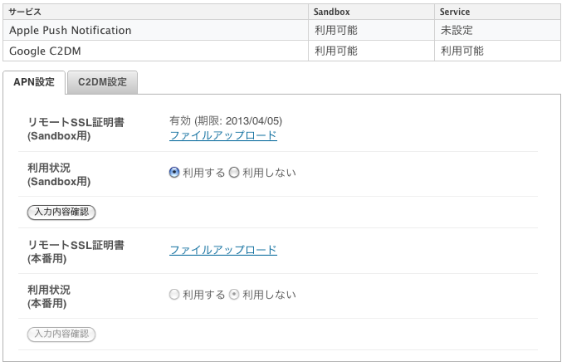
本番、Sandbox ともに、 SSL 証明書 (pem ファイル) の有効期限が切れた場合には、リモート通知が送信できなくなりますのでご注意下さい。有効期限が切れた場合には SSL 証明書 (pem ファイル) を入れ替えると、再び送信が可能となります。
リモート通知機能を試すだけであれば、Mobage Developers Japan に設定している CFBundleIdentifier と SSL 証明書 (pem ファイル) の整合性がとれている必要はありません。 SSL 証明書 (pem ファイル) と署名されている Provisioning Profile の整合性がとれていれば動作します。
リモート通知機能の使用方法
概要
リモート通知機能は、APNs や FCM を使用して実現されます。以下の概念図において、パートナー様の実装が必要な部分は、端末やサーバーから通知内容を送信する部分(1)、端末上で受信する部分(2)です。
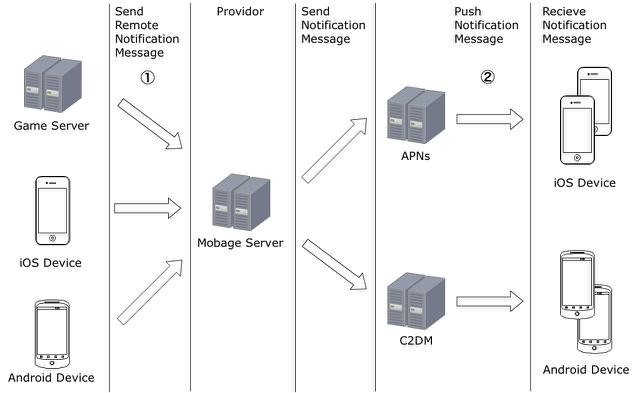
送信側の実装について
リモート通知機能の送信側には以下のケースが存在します。
| Location | API |
|---|---|
| User to User | Client API or RESTful API |
| Game to User | RESTful API |
Client APIとはSDKに含まれているAPIです。
RESTful API に関しまして、こちらもご参照下さい。
リモート通知内容について
リモート通知の送信内容は、payload ( JSON 形式) で指定できます。payload の フォーマットについて以下に説明します。送信された payload 内の内容は全て受信側で受け取ることが可能です。
| Name | 型 | 必須 | 説明 |
|---|---|---|---|
| message | String | Required | リモート通知のメッセージ内容です。通知バーに表示されます。UTF-8の文字列で指定してください。 |
| badge | Integer | Optional | iOS端末にリモート通知が送信された場合、badge の数値は受信側のアイコンのバッジとして使用されます。badge が指定されない場合は数字は特に送信されません。Android端末の場合は、badge が送信されても影響は有りません。 |
| sound | String | Optional | iOS端末にリモート通知が送信された場合、受信側の警告音として使用されます。sound はアプリケーションに含まれた音声ファイル名になります。音声ファイルが存在しない場合、"default"が指定された場合、デフォルトの警告音が再生されます。Android端末の場合は、sound が指定されていても無視され音は再生されません。 |
| collapseKey | String | Optional | Android端末にリモート通知が送信された場合、対象端末がオフラインのときに、最後のメッセージだけが送信されるようにするための任意の文字列になります。Android端末上では、任意の文字列で上書きされて表示されます。ただし、リモート通知は通知の順序の保証がありませんので、本当に最後のメッセージかというのは保証できません。また、collapseKey が指定されていない場合は、全て同じ文字列が指定されます。iOS端末の場合は、collapseKey が指定されていても無視されます。 |
| style | String | Optional | Android端末にリモート通知が送信された場合、通知領域のスタイルとして使用されます。スタイルが指定されていない、またはスタイルが使用できない場合は、デフォルトのスタイルが指定されます。有効なスタイルは"normal"と"largeIcon"になります。Native / Unity SDK の場合、Android 2.3以上でのみ使用できます。詳細につきましては、こちらをご確認下さい。iOS端末の場合は、style が指定されていても無視されます。 |
| iconUrl | String | Optional | Android端末にリモート通知が送信された場合、かつ style が指定されている場合、iconUrl は、Androidの通知領域に表示されるイメージを決定するために使用されます。iOS端末の場合は、iconUrl が指定されていても無視されます。 |
| extras | Object | Optional | 任意の1階層分の連想配列を Key/Value の形式で設定することができます。 例){ "foo" : "1", "bar" : "twenty one" } |
User to User
User to User の通知送信方法について説明します。
User to User のリモート通知の送信は以下のように Client API と RESTful API でそれぞれ行うことができます。
-
Native iOS Client API :
NSMutableDictionary *extras = [NSMutableDictionary dictionary];[matrix setValue:1 forKey:@"foo"];[matrix setValue:@"twenty one!" forKey:@"bar"];MBGRemoteNotificationPayload *payload = [MBGRemoteNotificationPayload payloadWith:@"Simon! Come join my quest."badge:1sound:@"default"collapseKey:@""style:@""iconUrl:@""extras:extras];[MBGSocialRemoteNotification send:@"10028"data:payloadonSuccess:^(MBGRemoteNotificationResponse *resp) {/* successful queueing of the remote notification */} onError:^(MBGError *error) {/* error handling code is here */}]; -
Native Android Client API :
String recipientId = "10028";String msg = "Simon! Come join my quest.";String collapseKey = "";String style = "";String iconUrl = "";Map<String, String> extras = new HashMap<String, String>();extras.put("hoge", "fuga");extras.put("foo", "bar");RemoteNotificationPayload payload = new RemoteNotificationPayload(msg);payload.setCollapseKey(collapseKey);payload.setStyle(style);payload.setExtras(extras);payload.setIconUrl(iconUrl);RemoteNotification.send(recipientId, payload, new OnSendComplete() {@Overridepublic void onSuccess(RemoteNotificationResponse response) {/* successful queueing of the remote notification */}@Overridepublic void onError(Error error) {/* error handling code is here */}}); -
RESTful API : 3-legged の認証が必要になります。ゲームサーバーから以下の EndPoint に POST してください。
RESTful API に関しまして、こちらもご参照下さい。
POST /social/api/restful/v2/remote_notification/@app/@all/{recipientId}
POST /social/api/restful/v2/remote_notification/@app/@all/10258
Content-Type: application/json; charset=utf-8
Authorization: OAuth realm="", oauth_consumer_key="31816a6d9beac8c11bc5", oauth_nonce="b9a19f5ceac92a7b99b7", oauth_signature="yY0IRUStlDYw1qcyPuz8fsD%2BIrs%3D", oauth_signature_method="HMAC-SHA1", oauth_timestamp="1331798387", oauth_token="sp_client_id%3A58cee178e5ea60732d2b6fae0294da9d", oauth_version="1.0"

{
    "payload" : {
        "message": "Simon! Come join my quest.",
        "extras": {
            "foo": "1",
            "bar": "twenty one!"
        }
    }
}

201 Created
- recipientId には、送信先の UserId を指定します。
- payload には、送信内容を JSON 形式で指定します。
Game to User
Game to Single User のリモート通知の送信方法について説明します。
2-legged での OAuth Request (Consumer Request) を行なってください。具体的には以下のように POST します。Game to User には以下の 3 パターンでの送信が可能です。
RESTful API に関しまして、こちらもご参照下さい。
- Game to Single User
- 既にゲームを始めている単体のユーザーに対してのリモート通知の送信
- 送信制限はありません。(以前は 4 時間に 1 度の送信制限がありましたが、現在はありません)
- Game to Multiple User
- 既にゲームを始めている複数のユーザーに対してのリモート通知の送信
- 送信制限はありません。ただし、1 度の通信で送信できる件数の上限は 1000 件です。
- Game to All User
- 既にゲームを始めている全てのユーザーに対してのリモート通知の一斉送信
- 1 時間に 1 度のみ送信できます。もし制限を超えた場合には、 429 Too Many Requests が返却されます。
Single User への送信: RESTful API 2-legged OAuth Request (Consumer Request)
POST /social/api/restful/v2/remote_notification/@app/@all/{recipientId}
POST /social/api/restful/v2/remote_notification/@app/@all/10258
Content-Type: application/json; charset=utf-8
Authorization: OAuth realm="", oauth_consumer_key="31816a6d9beac8c11bc5", oauth_nonce="5f5ae6a5688795cab25d", oauth_signature="tuLm4o%2FvwzdQK%2FuWAGii9ab3ZiI%3D", oauth_signature_method="HMAC-SHA1", oauth_timestamp="1331798463", oauth_version="1.0"

{
    "payload" : {
        "message": "Simon! Come join my quest.",
        "extras": {
            "foo": "1",
            "bar": "twenty one!"
        }
    }
}

201 Created
Multiple User (複数ユーザー)への送信: RESTful API 2-legged OAuth Request (Consumer Request)
POST /social/api/restful/v2/remote_notification/@app/@all
POST /social/api/restful/v2/remote_notification/@app/@all
Content-Type: application/json; charset=utf-8
Authorization: OAuth realm="", oauth_consumer_key="31816a6d9beac8c11bc5", oauth_nonce="5f5ae6a5688795cab25d", oauth_signature="tuLm4o%2FvwzdQK%2FuWAGii9ab3ZiI%3D", oauth_signature_method="HMAC-SHA1", oauth_timestamp="1331798463", oauth_version="1.0"

{
  "recipientId": ["10000", "10001", "10002"],
  "payload": {
    "message": "A New update is available.  Please download now!",
    "extras": {
            "foo": "1",
            "bar": "twenty one!"
    }
  }
}


202 Accepted
Content-Type: application/json; charset=utf-8

{
   "published" : "2013-09-17T06:55:53",
   "payload" : {
      "extras" : {
            "foo": "1",
            "bar": "twenty one!"
      },
      "message" : "A New update is available.  Please download now!"
   },
   "groupId" : "@all",
   "recipientId" : [
      "sb.mbga.jp:10000",
      "sb.mbga.jp:10001",
      "sb.mbga.jp:10002"
   ]
}
All User (全ユーザー) への送信: RESTful API 2-legged OAuth Request (Consumer Request)
POST /social/api/restful/v2/remote_notification/@app/@all
POST /social/api/restful/v2/remote_notification/@app/@all
Content-Type: application/json; charset=utf-8
Authorization: OAuth realm="", oauth_consumer_key="31816a6d9beac8c11bc5", oauth_nonce="5f5ae6a5688795cab25d", oauth_signature="tuLm4o%2FvwzdQK%2FuWAGii9ab3ZiI%3D", oauth_signature_method="HMAC-SHA1", oauth_timestamp="1331798463", oauth_version="1.0"

{
    "payload" : {
        "message": "Simon! Come join my quest.",
        "extras": {
            "foo": "1",
            "bar": "twenty one!"
        }
    }
}

202 Accepted
- 制限事項
- Game to All User の場合、1 時間に 1 度しかリモート通知ができません。もし制限を超えた場合には、 429 Too Many Requests が返却されます。
受信側の実装について
リモート通知の受信側の実装について説明します。
初期設定について
リモート通知を受け取るために、以下の様な初期設定をする必要があります。
-
Native iOS Client API :
-
AppDelegate.mmに以下を追記します。
-(void)application:(UIApplication*)application didRegisterForRemoteNotificationsWithDeviceToken:(NSData*)deviceToken {[MBGPlatform registerForRemoteNotification:deviceToken];}-(void)application:(UIApplication*)application didFailToRegisterForRemoteNotificationsWithError:(NSError*)error {NSLog(@"Failed to register for remote notifications. Error=%@", error);}- (void)application:(UIApplication *)application didReceiveRemoteNotification:(NSDictionary *)userInfo {// get stateUIApplicationState state = [application applicationState];if (state == UIApplicationStateActive) {}else if (state == UIApplicationStateInactive){}NSLog(@"%@", userInfo);NSString *msg = [[NSString string] stringByAppendingFormat:@"%@", userInfo];}
-
-
Native Android Client API :
警告
Mobage Native SDK for Android v1.12.0 以上をご利用の場合、初期化処理については
こちらを https://docs.mobage.com/display/JPSA/MobageNativeSDK_Android_ChangeLog_1.12.0 ご参考ください。
:::
-
Mobage.initialize() 呼び出し後に、以下のメソッドを呼び出します。
Mobage.registerForRemoteNotification();- ただし、アプリ内で Firebase を独自に利用する場合、以下に従う必要があります。
- アプリ側で Firebase の初期化 ([DEFAULT] での初期化)を Mobage.registerForRemoteNotification() 呼び出しよりも前に行う場合
- Mobage.registerForRemoteNotification(true) を呼び出します。
- アプリ側で Firebase の初期化を Mobage.registerForRemoteNotification() 呼び出しよりも後に行う場合
- Mobage.registerForRemoteNotification() を呼び出します。
- こちらの リンクに従い、 FirebaseApp.initializeApp での初期化時の第三引数に、アプリ側で決定したインスタンス名を指定して初期化してください。
- アプリ側で Firebase の初期化 ([DEFAULT] での初期化)を Mobage.registerForRemoteNotification() 呼び出しよりも前に行う場合
- ただし、アプリ内で Firebase を独自に利用する場合、以下に従う必要があります。
-
Main の Activity クラスに以下のようなフラグを追加します。
private boolean started = false; -
Main の Activity の onCreate() 内に以下のように追記します。
RemoteNotification.setListener(new RemoteNotificationListener() {public void handleReceive(Context context, Intent intent) {RemoteNotificationPayload payload = RemoteNotification.extractPayloadFromIntent(intent);Log.i("---------------", "#### " + payload.getMessage());RemoteNotification.displayStatusBarNotification(context, intent);}});if(!started) {handleIntent(getIntent());started = true;} -
Main の Activity クラスで以下のように onNewIntent() をオーバーライドし、handleIntent()を呼び出します。
@Overrideprotected void onNewIntent (Intent intent){Log.i(TAG, "onNewIntent");handleIntent(intent);} -
Main の Activity クラス内に以下の handleIntent() を追加します。アプリケーションが起動していない場合、バックグラウンドの場合は、通知領域でメッセージをタップした時に以下のメソッドが呼ばれます
private void handleIntent(Intent intent){if (intent != null) {setIntent(intent);Bundle extras = intent.getExtras();if(extras == null){Log.i(TAG, "Intent extras is empty");}else{String message = extras.getString("message");String extrasJsonString = extras.getString("extras");Log.i(TAG, "message" + message);}}} -
drawable/icon.png が正しく設定されていなければなりません。(通知領域に通知する際に使用します)
-
AndroidManifest.xml の
タグの外に以下を追記します。 <uses-permission android:name="android.permission.INTERNET" /> -
AndroidManifest.xmlの
タグの中に以下を追記します。 <serviceandroid:name="com.mobage.android.fcm.MessageListenerService"android:exported="false"><intent-filter><action android:name="com.google.firebase.MESSAGING_EVENT" /></intent-filter></service><service android:name="com.mobage.android.fcm.RemoteNotificationController$FcmMobageJobService"android:exported="false"><intent-filter><action android:name="com.firebase.jobdispatcher.ACTION_EXECUTE"/></intent-filter></service> -
AndroidManifest.xmlの
タグ内の Main Activity の launchMode を設定します。 Mobage Native SDK 1.4以降 android:launchMode="standard" 又は android:launchMode="singleTop" -
アプリケーションの build.gradle の設定。以下を追加してください。
警告
Mobage Native SDK for Android v1.12.0 以上をご利用の場合、初期化処理については
こちらを https://docs.mobage.com/display/JPSA/MobageNativeSDK_Android_ChangeLog_1.12.0 ご参考ください。
:::
- ```java
   dependencies{
      implementation 'com.google.firebase:firebase-messaging:17.1.0'
      implementation 'com.firebase:firebase-jobdispatcher:0.8.5'
  }
  ```
リモート通知の受信設定を有効にするために、Client API の setRemoteNotificationsEnabled() に true が設定されている必要があります。また、setRemoteNotification() はログイン後に呼び出さないと効果がありません。実装例は以下のようになります。
-
Native iOS Client API :
[MBGSocialRemoteNotification setRemoteNotificationsEnabled:trueonSuccess:^{/* flag was set properly */} onError:^(MBGError *error) {/* An error occurred in setting this value */}]; -
Native Android Client API :
RemoteNotification.setRemoteNotificationsEnabled(true, new OnSetRemoteNotificationsEnabledComplete() {@Overridepublic void onSuccess() {/* flag was set properly */}@Overridepublic void onError(Error error) {/* An error occurred in setting this value */}});
この処理が実行されるまでにはリモート通知の受信機能が有効にならないため、アプリケーションの初回起動時の早いタイミングで行うことを推奨します。
また、上記フラグは、常にgetRemoteNotificationsEnabled() で取得することができます。
リモート通知機能の受信側には以下のケースが存在します。
- アプリケーションがフォアグラウンドの時にリモート通知を受信した場合
- アプリケーションがバックグラウンドの時にリモート通知を受信した場合
- アプリケーションが起動していない時にリモート通知を受信した場合
以下にそれぞれのケースの実装方法について説明します。通知内容を取得しない場合は、実装する必要はありません。
Native iOS Client API
アプリケーションがフォアグラウンドの場合
アプリケーションがフォアグラウンドの場合は、通知内容が didReceiveRemoteNotification に通知されます。OS の通知領域には通知されません。フォアグラウンドの場合は、UIApplicationState が UIApplicationStateActive となっています。
アプリケーションがバックグラウンドの場合
端末の通知領域にメッセージが表示されますので、メッセージをタップすると、アプリケーションがフォアグラウンドになります。フォアグラウンドになった時に、通知内容が didReceiveRemoteNotification へ通知されます。バックグラウンドの場合は、UIApplicationState が UIApplicationStateInactive となっています。
アプリケーションが起動していない場合
端末の通知領域にメッセージが表示されますので、メッセージをタップするとアプリケーションが起動します。
アプリケーション起動時に、AppDelegate.mm 内の didFinishLaunchingWithOptions 内で以下のコードを呼び出すことで、通知内容を取得できます。
[launchOptions objectForKey:@"UIApplicationLaunchOptionsRemoteNotificationKey"]
Native Android Client API
アプリケーションがフォアグラウンドの場合
アプリケーションがフォアグラウンドの場合、RemoteNotification.setListener() にセットされた RemoteNotificationListener の handleReceive に通知内容が通知されます。RemoteNotification.displayStatusBarNotification() をコールすることで、OS の通知領域にメッセージが表示されます。ngCore や Native iOS と挙動を合わせるためには、起動している場合に RemoteNotification.displayStatusBarNotification() をコールしない処理を加えることで可能になります。具体的には以下のように記述してください。
-
Main の Activity クラス内に以下のメンバ変数を追加します。
private boolean isPaused = false; -
onPause と onResume で以下のように isPaused フラグを追記します。
@Overridepublic void onPause(){super.onPause();Mobage.onPause();isPaused = true;}@Overridepublic void onResume(){super.onResume();Mobage.onResume();isPaused = false;} -
isPaused が true の場合のみ、RemoteNotification.displayStatusBarNotification() をコールしてください。
アプリケーションがバックグラウンドの場合
アプリケーションがフォアグラウンドの場合と同様に、RemoteNotification.setListener() にセットされた RemoteNotificationListener の handleReceive に通知内容が通知されます。通知領域に通知する方法は、フォアグラウンドの場合と同様に RemoteNotification.displayStatusBarNotification() をコールしてください。通知領域のメッセージをタップすると、アプリケーションがフォアグラウンドになります。
アプリケーションが起動していない場合
アプリケーションが起動していない場合は、必ず通知領域に通知されます。通知領域のメッセージをタップすると、アプリケーションが起動します。アプリケーションが起動する時には、受信側の実装にある handleIntent() が呼ばれますので、そちらで通知内容を取得して下さい。
Native Android で音や振動を鳴らしたい場合 (Mobage Native SDK 1.4.7 以降)
以下のように RemoteNotificationClient クラスを登録し、tweakNotification メソッドをカスタマイズすると音や振動を鳴らすことができます。
RemoteNotification.setRemoteNotificationClient(new RemoteNotificationClient(){
    @Override
    public void tweakNotification(Notification notification, Context context, Intent intent) {
        notification.defaults |= Notification.DEFAULT_SOUND;
        notification.vibrate = new long[]{0, 200, 100, 200, 100, 200};
    }
});
RemoteNotificationClient クラスは、handleRegistration、handleMessage、tweakNotification で構成されており、それぞれのタイミングで操作を引き継ぐことができます。
public static class RemoteNotificationClient {
  /**
   * Give the host application a chance to take over the control when a registration id is about to be received in the application.
   * If the host application wants to handle the registration id, return true, otherwise return false.
     * @param context The Context in which the remote notification receiver is running.
     * @param registrationId The String  being received.
   * @return True if the host application wants to handle the registration intent itself, otherwise return false.
   */
  public boolean handleRegistration(Context context, String registrationId) {
    return false;
  }

  /**
   * Give the host application a chance to take over the control when a remote notification message intent is about to be received in the application.
     *  If the host application wants to handle the message intent and display notification, return true, otherwise return false.
     * @param context The Context in which the remote notification receiver is running.
     * @param intent The Intent being received.
   * @return True if the host application wants to handle the message intent itself, otherwise return false.
   */
    public boolean handleMessage(Context context, Intent intent) {
      return false;
    }

  /**
   * Give the host application a chance to tweak the Notification instance before the notification is displayed by the SDK.
     * @param notification The Notification instance that is created and will be display by the SDK.
     * @param context The Context in which the remote notification receiver is running.
     * @param intent The Intent being received.
   */
    public void tweakNotification(Notification notification, Context context, Intent intent) {
      return;
    }
}
Unity Android で音や振動を鳴らしたい場合 (Mobage Unity SDK 1.4.7 以降)
Mobage Unity SDK 1.4.7 以降のパッケージの samples/RemoteNotificationClient/README.txt をご確認ください。リモート通知の挙動をカスタマイズすることができます。
Native / Unity Android で iconUrl または style=largeIcon を使用する際の注意点
Mobage Native / Unity SDK Android を使用して、 payload 内で iconUrl または style=largeIcon を指定する場合、以下の点に注意する必要があります。
- 受信側が Android 4.0 以上の端末である必要があります。
- Project Target API Level が 26 以上である必要があります。
- android:minSdkVersion も 14 以上にしてください。
- iconUrl または style=largeIcon を使用すると、一部機種では端末の問題により表示がおかしくなる等の問題があります。
- drawable/rn_icon.png の設置は通知を受け取る際には必ず必要となります。
- Mobage Native SDK の場合
- Mobage Native SDK に 含まれる MobageNativeAndroid/res_rn_v9/layout-v9 フォルダをプロジェクトの res フォルダ以下にコピーして使用して下さい。
- Mobage Unity SDK の場合
- Mobage Unity SDK に 含まれる MobageNativeAndroid/res_rn_v9/layout-v9 フォルダを Unity プロジェクト内の Plugins/res フォルダ以下にコピーして使用して下さい。
Native iOS で didReceiveRemoteNotification に通知される Payload について
Native iOS でdidReceiveRemoteNotificationに通知される内容は以下のようになります。
コード内で適宜処理して頂けるようお願いします。
| Type | Name | 必須 | 説明 |
|---|---|---|---|
| {Object} | aps | 必須 | iOS のリモート通知機能にデフォルトで設定されたオブジェクトです |
| {String} | aps.alert | 必須 | RemoteNotification.message |
| {String} | aps.sound | Optional | RemoteNotification.payload.sound |
| {Number} | aps.badge | Optional | RemoteNotification.payload.badge |
| {Array} | x | 必須 | Mobage のための拡張フィールドです |
| {Number} | x[0] | 必須 | Flags describing the notification. (?1). |
| {String} | x[1] | 必須 | RemoteNotification.id. base64 encoded UUID. |
| {String} | x[2] | 必須 | RemoteNotification.senderId |
| {Object} | x[3] | 必須 | RemoteNotification.payload.extras |
| {Number} | x[4] | 必須 | UNIX timestamp of RemoteNotification.published |
例:
{"aps":{"alert":"RemoteNotification.payload.message goes here!","badge":2,"x":[0,"2znkvHo7NzCmbAkjLpadqw==",34567,{"baz":42,"foo":"bar"},19283746543],"sound":"default"}}
リモート通知が送信される端末について
リモート通知が送信される端末は、以下の様なルールに基づいています。
- Mobage へのログイン時に Mobage の UserId と端末の DeviceId (デバイストークン) が紐付き、端末へのリモート通知が送信可能な状態となります。
- Mobage からログアウトすると、UserId と端末の DeviceId (デバイストークン) が紐付いた情報は削除され、端末へのリモート通知は送信不可能な状態となります。
- 同じ UserId を用いて複数端末でログインしているような場合、最後にアプリを起動した端末にリモート通知が送られるようになります。ログアウト時の挙動は、Android 端末でログアウトした場合には Android 端末、iOS 端末でログアウトした場合には iOS 端末でリモート通知が送信されなくなります。
デバイストークンの登録状態確認機能について
リモート通知機能は、SDK がスマートフォン端末毎にデバイストークンを取得し、プラットフォーム側に登録することで該当のアプリを遊んでいる端末を特定し、リモート通知を送ることができます。デバイストークンの登録状態確認機能は、デバイストークンが既にプラットフォームに登録されているかどうかを確認することができます。デバイストークンは以下のケースで登録されたり削除されたりします。一度に登録されるデバイストークンの数は Android 端末、iOS 端末で それぞれ 1 端末分のみです。
- デバイストークンがプラットフォームに登録されるタイミング
- アプリへのログイン時に登録されます。
- 既にログインしている場合、アプリ起動時に毎回登録されます。
- デバイストークンがプラットフォームから削除されるタイミング
- アプリからログアウトした場合に削除されます。
デバイストークンの登録状態確認機能の仕様
デバイストークンの登録状態確認機能の詳細は以下になります。
-
リクエスト形式
GET /social/api/restful/v2/remote_notification/@app/@all/{userId}/state -
URI Template パラメータ
- userId
-
userId パラメータは下記のいずれかの値を指定します。
値 説明 型 備考 {userId} ユーザー ID string or array 必須
-
- userId
-
指定できるクエリパラメータ
-
fields
Field Name Type Description userId String ユーザー ID enabled Boolean デバイストークンの登録有無(true/false) appId String アプリ ID updated Date デバイストークンの登録状態の最終更新日 (YYYY-MM-DDThh:mm:ss)
-
サンプル
1 User のデバイストークンの登録状態を確認する
-
リクエスト例
GET /social/api/restful/v2/remote_notification/@app/@all/10001/state?fields=appId,updated -
レスポンス例
200 OKContent-Type: application/json{"userId": "10001","enabled": true,"appId": "120XXXXX","updated": "2013-06-05T12:00:00"} -
1 User で指定した場合のレスポンス形式
Field Name Type Description userId String ユーザー ID enabled Boolean デバイストークンの登録有無(true/false) appId String アプリ ID updated Date デバイストークンの登録状態の最終更新日 (YYYY-MM-DDThh:mm:ss)
複数 User のデバイストークンの登録状態を確認する
-
リクエスト例
GET /social/api/restful/v2/remote_notification/@app/@all/10001,10002,10003/state?fields=appId,updated -
レスポンス例
200 OKContent-Type: application/json{"entry": [{ "userId": "10001", "enabled": true },{ "userId": "10002", "enabled": false },{ "userId": "10003", "enabled": true }],"itemsPerPage": 3,"totalResults": 3,"startIndex": 1} -
複数 User 指定した場合のレスポンス形式
Field Name Type Description entry Array entry[].userId string ユーザー ID entry[].enabled string デバイストークンの登録有無(true/false) entry[].appId string アプリ ID entry[].updated string デバイストークンの登録状態の最終更新日 (YYYY-MM-DDThh:mm:ss) totalResults Integer 総エントリ数 itemsPerPage Integer ページ当たりのエントリ数 (必ず件数と同じ値が返ります) startIndex Integer 開始インデックス値 (常に 1 を返します) 警告
1000 件以上のリクエストを送っても常に 1000 件までのレスポンスが返ります :::
参考資料
- RESTful API に関しまして、こちらもご参照下さい。
更新履歴
- 2018/11/13
- Mobage Native / Unity SDK 1.7.0 リリース及び FCM 対応に伴い、大幅に変更
- 2016/09/21
- Mobage Native SDK 1.4.11 リリースに伴い AndroidManifest.xml の内容を変更
- 2014/08/22
- Mobage Native SDK 1.4.7 で RemoteNotification を受け取った後の挙動を変更することができるようになったのに伴い、追記。
- 2014/03/19
- Grade 1 ユーザーでも User to User が利用になったので追記
- 2013/11/14
- GCMについて追記
- 2013/11/13
- UnityのAndroid ManifestのlaunchModeを訂正
- 2013/10/24
- UnityのMobageSocialRemoteNotification.setListener()の配置場所をonLoginComplete()に訂正。
- 2013/10/03
- 複数 User への一括送信について追記
- デバイストークンの登録状況確認機能について追記
- 2013/05/09
- Android ManifestのlaunchmodeがSDKによって異なる為、訂正。
- 2013/04/22
- 「リモート通知が送信される端末について」に誤記があったため、訂正。
- 2013/04/17
- Unity Android SDKの場合、Android Manifestにpermissionとreceiverの記載が必要と追記
- 2013/01/07
- 「リモート通知が送信される端末について」を追記
- 2012/09/13
- 「Native iOS で didReceiveRemoteNotification に通知される Payload について」を追記
- 2012/08/01
- payload 内の extras に数値を含めると Unity SDK iOS の場合、受信時に問題があるので例を文字列に変更
- 2012/07/31
- 細かい文言の修正
- 2012/07/25
- 受信側の Native Android Client API の『アプリケーションが起動していない場合』の記述に誤りがあったため訂正
- 2012/07/19
- 『初期設定について』の項で一部修正・追記。
- AndroidManifest.xmlの記載で、uses-permission を
タグの中に記載するという記載になっていたがタグの外に修正 - Unity IDE 内で BundleIdentifier を設定する必要があるため追記
- 2012/07/06
- Mobage Unity SDK 1.3 でリモート通知機能が使用可能になったのに伴ない追記
- 文章のわかりにくい部分を修正
- 2012/07/05
- 使用可能バージョンを Mobage Native SDK 1.3.0.1 に修正
- setRemoteNotificationsEnabled ログイン後に呼び出すように追記
- Mobage Native SDK Android の受信側の記載を修正
- 2012/06/27
- Mobage Native SDK 1.3 でリモート通知機能が使用可能になったのに伴ない追記
- 2012/06/13
- Mobage ngCore Android の本番環境ででリモート通知機能が可能になったのに伴ない修正
- 2012/05/30
- .pemファイルの作成方法の12番目を修正
- 2012/04/25
- C2DM設定が「未設定」→「利用可能」となったのに伴ない修正
- 2012/04/12
- 再署名(リモート通知用のre-signツールについて)について追記
- 2012/04/11
- 新規作成