Remote Notificationを送信する
この章では Remote Notification を送信するプログラムを開発します。
2014/03/19 より Grade 1 のユーザーでも User to User のリモート通知機能が利用可能となりました。
リモート通知は定型文のみの利用が可能です。
Remote Notification を有効にする (Androidの場合)
Shell App Framework 1.3.0 よりリモート通知用アイコンファイル「rn_icon.png」の追加が必要となります。
リモート通知用アイコンファイルが追加されていないと、リモート通知アイコンが正常に表示されません。
リモート通知用アイコンファイルについて
画像のガイドラインについてはこちらを参考に、サイズ 36 x 36 px のアルファ設定を行った白の単色で作成してください。
リモート通知用アイコンファイルの追加方法
作成した画像の追加はデベロッパーサイト上のアセット管理よりアップロードをお願いします。
「アプリケーション詳細」 > 「Androidアプリ設定」 > 「アセット管理」
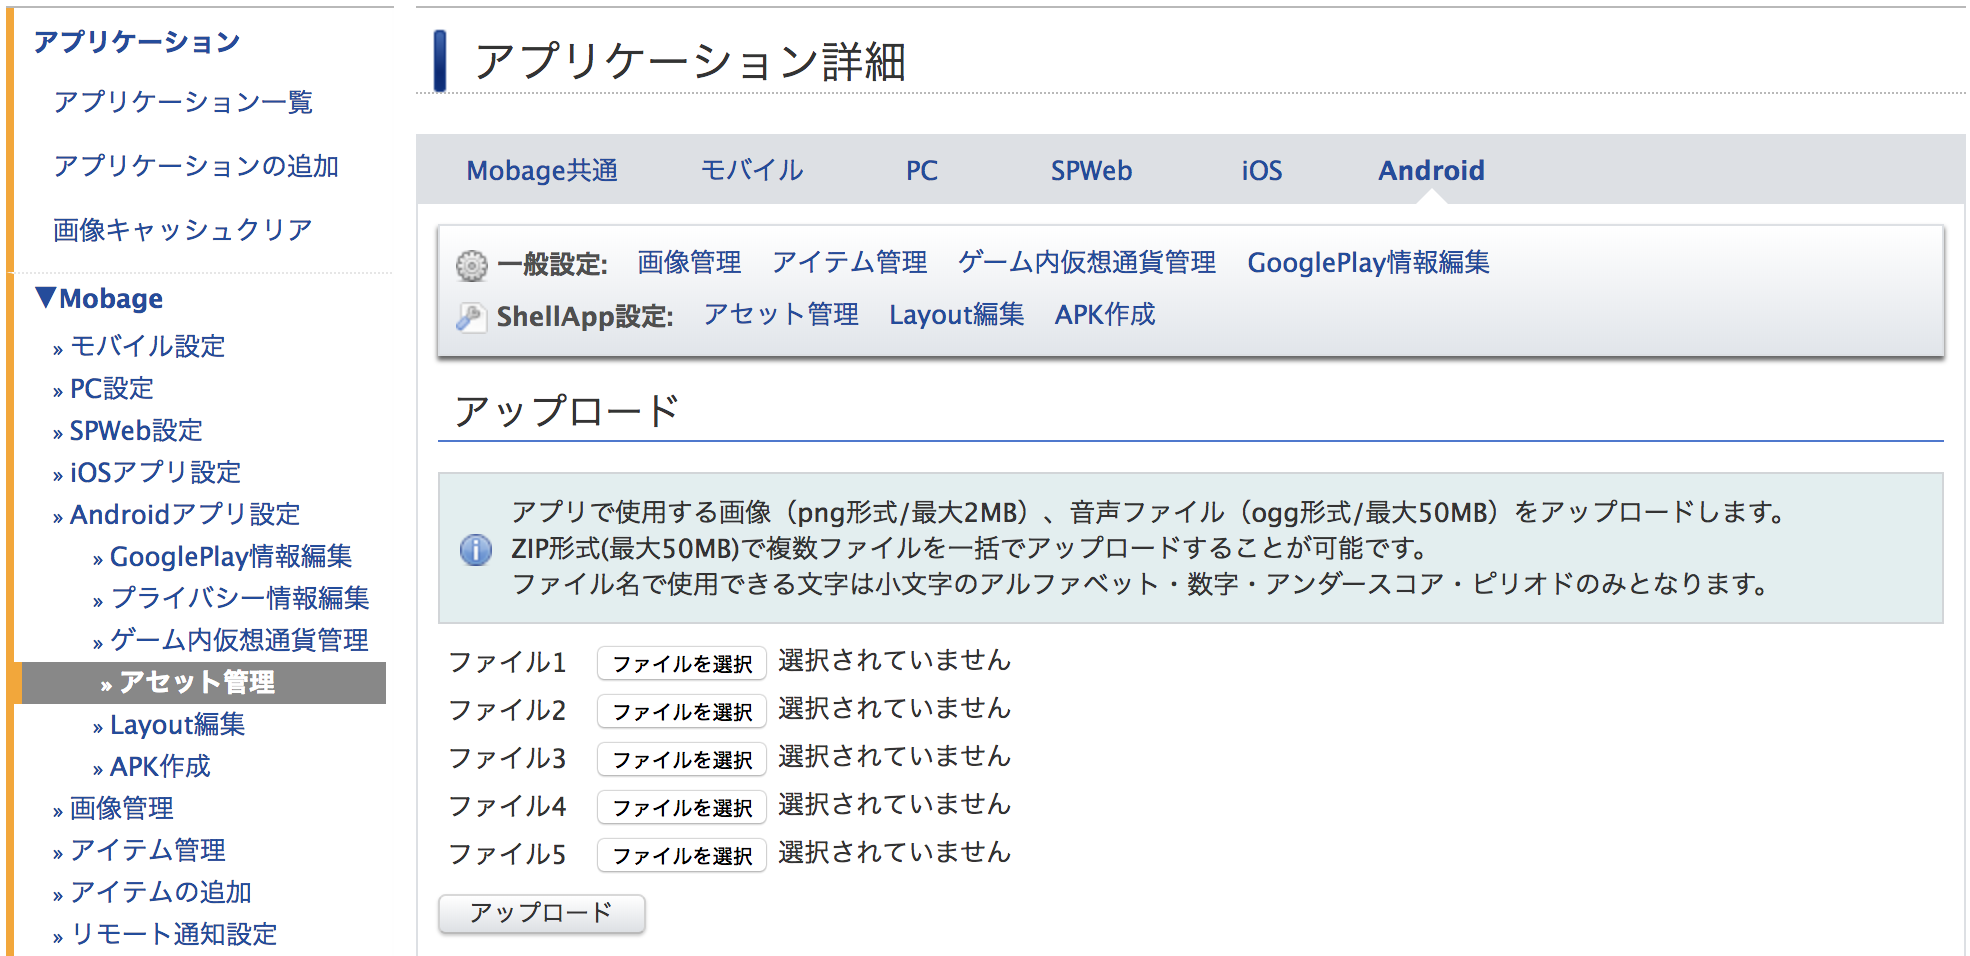
ShellApp 1.0.1 未満をご利用の場合のみ下記設定が必要となります。
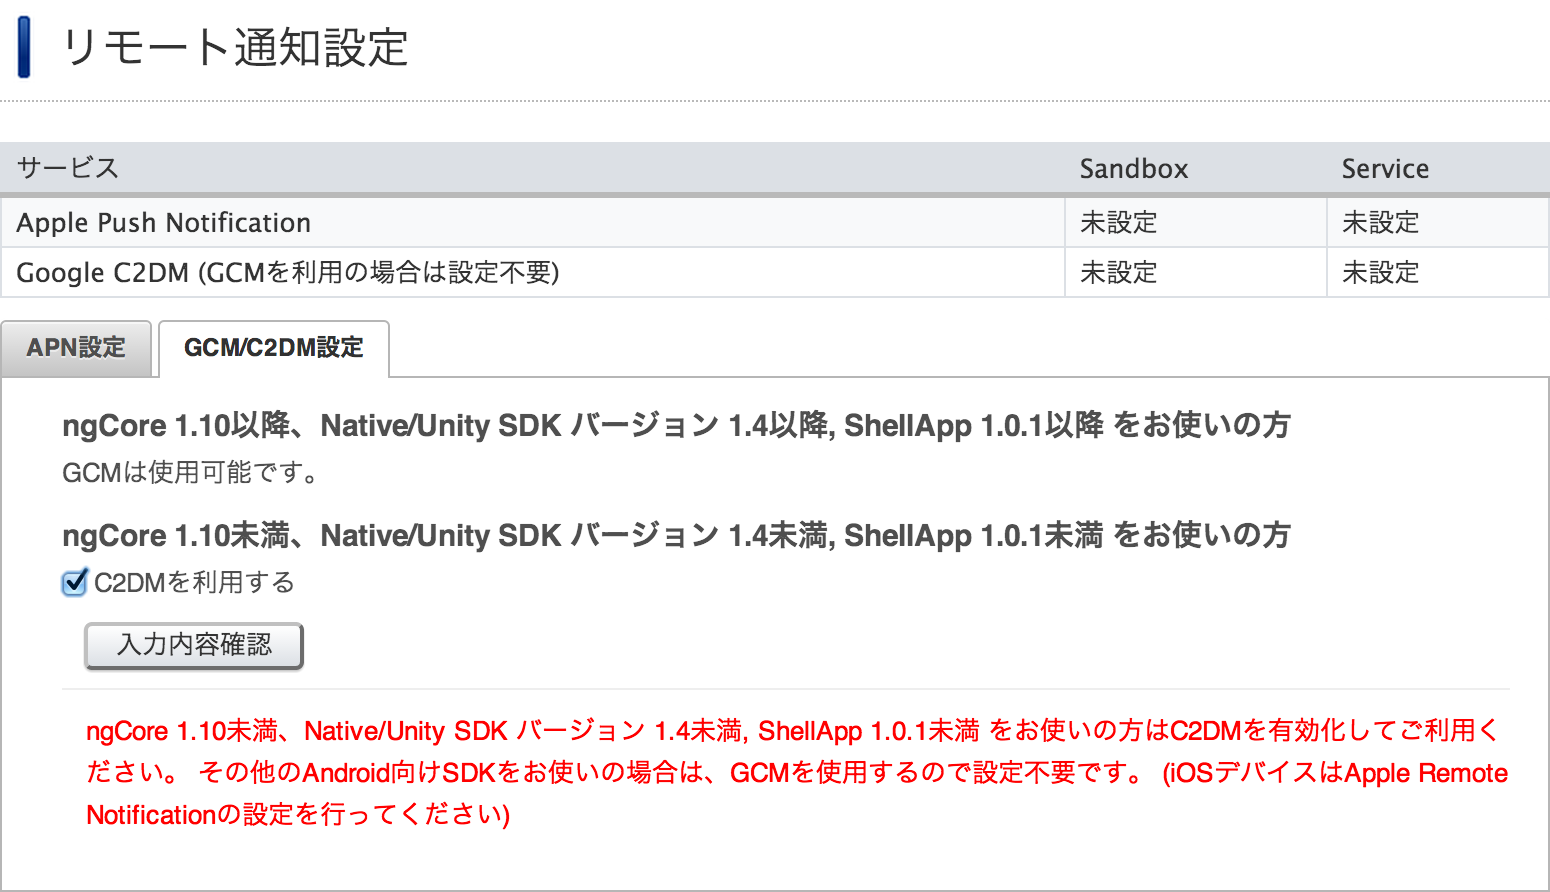
Remote Notification を有効にするためには、デベロッパーサイト上で Remote Notification を有効化する設定を行う必要があります。
「アプリケーション詳細」 > 「リモート通知設定」をクリックし、「GCM/C2DM設定」タブを選択して下さい。
「C2DMを利用する」チェックボックスにチェックを入れ有効化します。
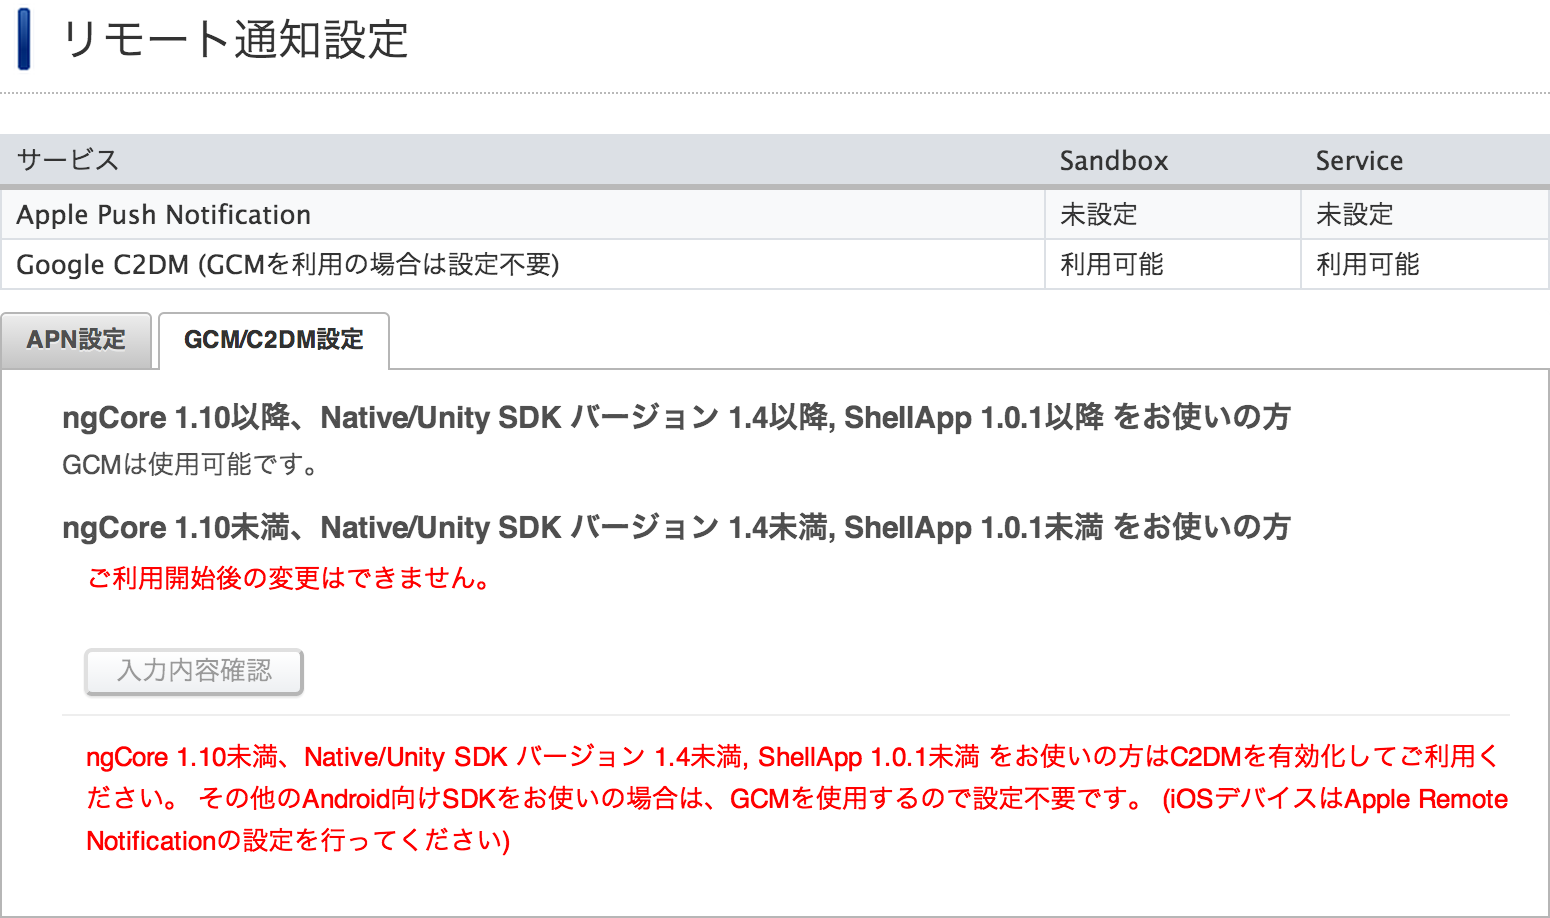
以下のように、有効化されている状態になります。
Remote Notification を有効にする (iOSの場合)
「アプリケーション詳細」 > 「リモート通知設定」をクリックし、「APN設定」タブを選択して下さい。
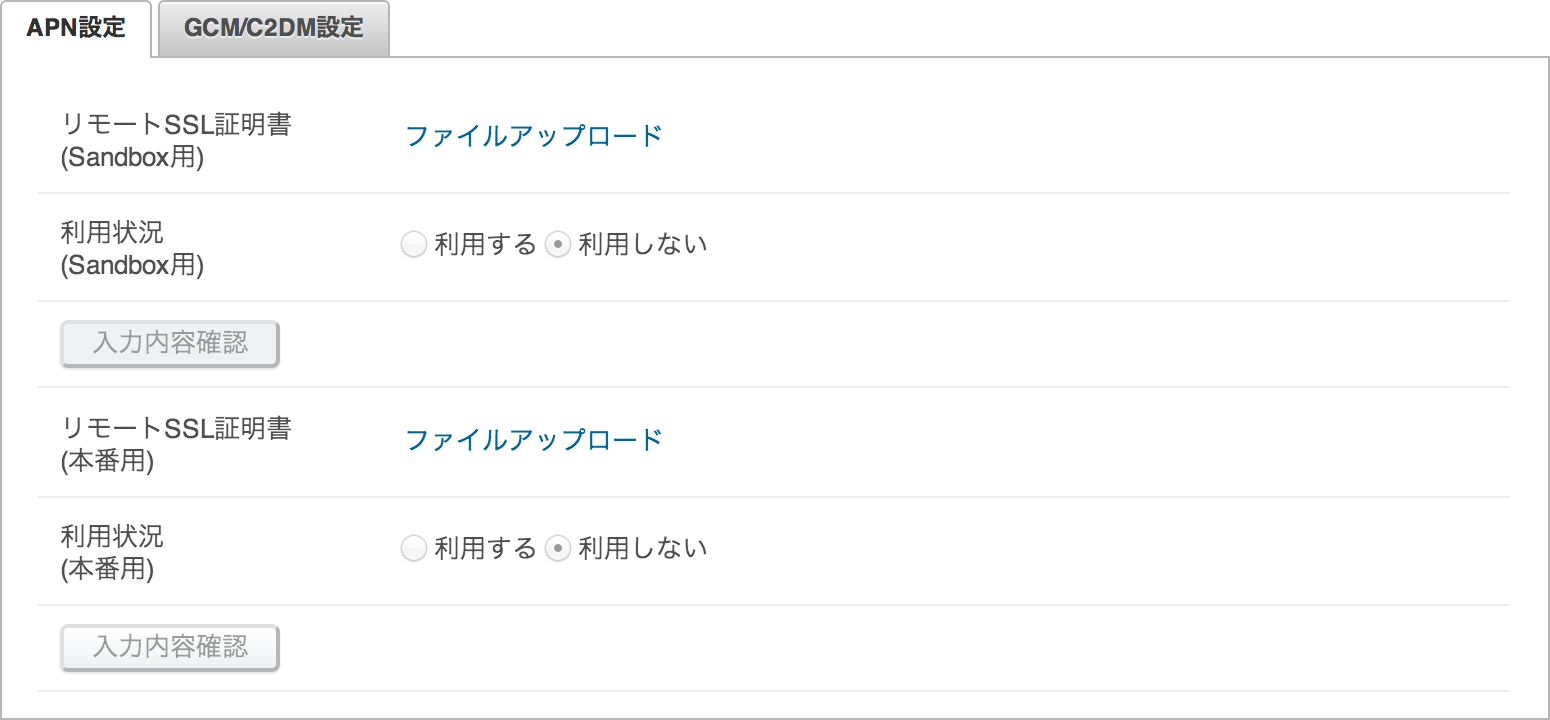
Sandbox 用と本番用のリモート SSL 証明書をアップロードすることができます。アップロードするファイルは .pem ファイルとなります。
.pemファイルの作成方法につきましては下記を参考にされるか、こちら(日本語)をご確認ください。
- iOS Dev Center の iOS Provisioning Portal へアクセスします。
- 左側のメニューより、App IDs をクリックします。
- 既にアプリケーションを作成している場合には、対象の App ID の「Configure」ボタンをクリックします。新規にアプリケーションを作成する場合には、右上の New App ID をクリックして、新規App IDを作成してください。
- 画面中段あたりの Enable for Apple Push Notification service をチェックします。(新規App ID作成につきまして、詳しくは iTunes Connect へのアップロード方法をご確認ください)
- Sandbox用は Development Push SSL Certificate の「Configure」ボタンをクリックします。本番用の場合は Production Push SSL Certificate の「Configure」ボタンをクリックします。 クリックすると、Apple Push Notification service SSL Certificate Assistant が起動します。
- キーチェーンアクセスを起動し、以下の手順に従って CertificateSigningRequest.certSignningRequest を作成します。
a. 上部メニューバーより、[キーチェーンアクセス]→[証明アシスタント]→[認証局に証明書を要求]をクリックします。
b. [ユーザのメールアドレス]と[通称]を入力、[要求の処理]に「ディスクの保存」を選択し、「続ける」ボタンをクリックします。(CAのメールアドレスと、鍵ペア情報を指定のチェックボックスは空で結構です)
c. 任意の保存先を選び、「保存」ボタンをクリックして CertificateSigningRequest.certSignningRequest を保存します。 - Apple Push Notification service SSL Certificate Assistant に戻り、「Continue」ボタンをクリックします。
- Submit Certificate Signing Request 画面へ遷移しますので、「ファイルを選択」ボタンをクリックし、先程作成した CertificateSigningRequest.certSignningRequest を選択します。
- Your APNs SSL Certificate has been generated. と表示されますので、「Continue」ボタンをクリックします。
- 「Download」ボタンをクリックすると、証明書がダウンロードされます。ダウンロード後は右下の「Done」ボタンをクリックしてください。Push SSL Certificate の Status が Enabled になっていることを確認してください。
- ダウンロードした証明書をダブルクリックして、キーチェーンに登録します。
- キーチェーンアクセスの左下の「分類」より「証明書」を選択、登録した Apple Development IOS Push Servicesを選択し、メニューバーより、[ファイル]→[書き出す]で任意の場所に「個人情報交換ファイル(p12)」を保存します。書き出す際には任意のパスワードの設定が必要です。
- ターミナルから以下のコマンドで、「個人情報交換ファイル(p12)」を.pemファイルに変換します。
$openssl pkcs12 -in 証明書.p12 -out 証明書.pem -nodes
上記で作成した.pemファイルを、「Upload SSL Certificate for Sandbox」ボタンをクリックしてアップロードします。Sandbox 用は Development Push SSL Certificate 、本番用は Production Push SSL Certificate をアップロードします。正常にアップロードされると有効期間が表示されます。
「利用状況(Sandbox用)」の「利用する」を選択します。
Remote Notification を送信する
このセクションでは、前セクションで有効化した Remote Notification 設定を利用し、Remote Notification を送るプログラムを開発します。Remote Notification の API は、Native アプリや ngCore アプリ向けのものを利用しますので、RESTful API のエンドポイントは、アプリケーション用のものを利用します。また、Remote Notification の送信には、User to User と Game to User の二種類がありますが、Shell App Frameworkの場合の送信には Game to User タイプの Remote Notification のみが利用可能です。
下記のようなremote_notification_send.phpを作成し、Remote Notification の送信プログラムを用意します。このプログラムでは、このアプリをインストールしている全ユーザーに対してブロードキャストします。
<?php
require_once ("OAuth.php");
require_once ('validator.php');

// Validate Request from Gadget Server
$valid = RequestValidator::validate();
if (!$valid) {
	// Respond Error Page
	print('<html><body><p>Invalid Request from Gadget Server</p></body></html>');
	exit ;
}

// Consumer Key from DevSite (or DevPortal)
$consumer_key = 'YourConsumerKey';
// Consumer Secret from DevSite (or DevPortal)
$consumer_secret = 'YourConsumerSecret';
// OAuth Consumer
$consumer = new OAuthConsumer($consumer_key, $consumer_secret, NULL);

// EndPoint URL for Remote Notification API (Using V2 API, Be Careful)
$url = "http://sb.sp.mbga-platform.jp/social/api/restful/v2/remote_notification/@app/@all";
// HTTP Method
$method = 'POST';
// Request to API Server
$request_to_API = OAuthRequest::from_consumer_and_token($consumer, NULL, $method, $url, NULL);
// Generate OAuth Signature
$request_to_API -> sign_request(new OAuthSignatureMethod_HMAC_SHA1(), $consumer, NULL);
// Create Authorization Header
$auth_header = $request_to_API -> to_header();

// Notification Message
$message = "This is a test message!!";
// Extra Parameters
$extras = array('bigUpdate' => 'true', 'mustDownloadNow' => 'true');
// Payload including Message and Extras
$payload = array('message' => $message, 'extras' => $extras);
// POST Body with Notification Data
$body = array('payload' => $payload);

// Execute HTTP Request to API Server
$curl = curl_init($url);
curl_setopt($curl, CURLOPT_POST, true);
curl_setopt($curl, CURLOPT_POSTFIELDS, json_encode($body));
curl_setopt($curl, CURLOPT_RETURNTRANSFER, true);
curl_setopt($curl, CURLOPT_FAILONERROR, false);
curl_setopt($curl, CURLOPT_ENCODING, "gzip");
curl_setopt($curl, CURLOPT_HTTPHEADER, array($auth_header));
$response = curl_exec($curl);
$status_code = curl_getinfo($curl, CURLINFO_HTTP_CODE);
curl_close($curl);

// Check Response from API Server
if ($status_code != 202) {
	// Respond Error Page
	print("<html><body><p>Got an error from API Server ($status_code, $response)</p></body></html>");
	exit ;
}

?>
<!DOCTYPE html>
<html>
<head>
<meta http-equiv="Content-Type" content="text/html; charset=UTF-8">
<meta name="viewport" content="width=device-width" />
</head>
<body style="margin: 0; text-align: center;">
	<p>Remote Notification has been Sent to All Users!</p>
</body>
</html>
<?php
exit;
?>
まず、validator.php を利用して妥当性検証を行います。
require_once ("OAuth.php");
require_once ('validator.php');

// Validate Request from Gadget Server
$valid = RequestValidator::validate();
if (!$valid) {
	// Respond Error Page
	print('<html><body><p>Invalid Request from Gadget Server</p></body></html>');
	exit ;
}
次に Consumer Key と Consumer Secret を設定します。Consumer Key と Consumer Secret の値はデベロッパーサイトの「アプリケーション詳細」共通設定タブ下部に記載されている値を使用してください。続いて、RESTful API の Remote Notification 送信のためのパラメータ設定を行います。
// EndPoint URL for Remote Notification API (Using V2 API, Be Careful)
$url = "http://sb.sp.mbga-platform.jp/social/api/restful/v2/remote_notification/@app/@all";
// HTTP Method
$method = 'POST';
// Request to API Server
$request_to_API = OAuthRequest::from_consumer_and_token($consumer, NULL, $method, $url, NULL);
// Generate OAuth Signature
$request_to_API -> sign_request(new OAuthSignatureMethod_HMAC_SHA1(), $consumer, NULL);
// Create Authorization Header
$auth_header = $request_to_API -> to_header();

// Notification Message
$message = "This is a test message!!";
// Extra Parameters
$extras = array('bigUpdate' => 'true', 'mustDownloadNow' => 'true');
// Payload including Message and Extras
$payload = array('message' => $message, 'extras' => $extras);
// POST Body with Notification Data
$body = array('payload' => $payload);
PHP 付属の Curl を使用して、RESTful API へのリクエストを発行します。
// Execute HTTP Request to API Server
$curl = curl_init($url);
curl_setopt($curl, CURLOPT_POST, true);
curl_setopt($curl, CURLOPT_POSTFIELDS, json_encode($body));
curl_setopt($curl, CURLOPT_RETURNTRANSFER, true);
curl_setopt($curl, CURLOPT_FAILONERROR, false);
curl_setopt($curl, CURLOPT_ENCODING, "gzip");
curl_setopt($curl, CURLOPT_HTTPHEADER, array($auth_header));
$response = curl_exec($curl);
$status_code = curl_getinfo($curl, CURLINFO_HTTP_CODE);
curl_close($curl);
RESTful API のレスポンス中のステータスコードをチェックし、正常でない場合 (202 でない場合) はエラー表示処理を行います。
// Check Response from API Server
if ($status_code != 202) {
	// Respond Error Page
	print("<html><body><p>Got an error from API Server ($status_code, $response)</p></body></html>");
	exit ;
}
Remote Notification を受信する
このセクションでは、Remote Notification を受信するプログラムを開発します。
Remote Notification のメッセージと payload を受け取るプログラムは、JavaScriptで記載します。今回は、スタートページである index.html に下記のような JavaScript のコードを書いておきます。
<!DOCTYPE html>
<html>
	<head>
		<meta http-equiv="Content-Type" content="text/html; charset=UTF-8">
		<meta name="viewport" content="width=device-width" />
		<script type="text/javascript" charset="utf-8">
			document.addEventListener('onShellAppReady', function(event) {
				var payload = mobage.shellapp.RemoteNotification.getPayload();
				if (payload) {
					alert(JSON.stringify(payload));
				}
			}, false);
		</script>
	</head>
	<body style="margin:0; text-align:center;">
		<p>Welcome To Mobage!</p>
		<a href="?url=http%3A%2F%2Fdev.gameserver.com%2Fmypage.php">My Page</a>
		<br>
		<br>
		<a href="?url=http%3A%2F%2Fdev.gameserver.com%2Fpayment_start.php">Buy Something</a>
		<br>
		<br>
		<a href="?url=http%3A%2F%2Fdev.gameserver.com%2Finvite_friends.php">Invite Friends to This Game</a>
		<br>
		<br>
		<a href="?url=http%3A%2F%2Fdev.gameserver.com%2Fremote_notification_send.php">Send Remote Notification to All Users</a>
	</body>
</html>
Shell App Framework のクライアントがページをロードした後に、mobage.shellapp オブジェクトが利用可能になったタイミングで、onShellAppReady というイベントが発生しますので、そのイベントハンドラーの中に処理を記載します。通常、onShellAppReady イベントは onLoad の後に呼ばれます。
mobage.shellapp.Remote Notification.getPayload 関数をコールすると、payload の内容が JavaScriptのオブジェクトとして取得できますので、その内容を alert 関数で単純に表示する処理になります。
			document.addEventListener('onShellAppReady', function(event) {
				var payload = mobage.shellapp.RemoteNotification.getPayload();
				if (payload) {
					alert(JSON.stringify(payload));
				}
			}, false);
また、送信側のプログラムである remote_notification_send.php へのリンクも index.htmlには追加しておきます。
<a href="?url=http%3A%2F%2Fdev.gameserver.com%2Fremote_notification_send.php">Send Remote Notification to All Users</a>
このセクションでは、ここまでのセクションで開発した Remote Notification 送受信プログラムを、実機で動作確認します。
アプリケーションを再書名する (iOSのみ)
iOS の app ファイル側でリモート通知機能を使用するためには、特別な re-sign ツールを使用して再署名する必要があります。
以下のツールをダウンロードして、使用例に従い再署名してください。
usage: $sh re-sign-notification.sh  <application> <mobileprovision> <identity> <appPrefix> <bundleId> <environment: development or production>

// 開発用、Sandbox用をご使用の場合は、以下のように使用してください。
example: $sh re-sign-notification.sh webgame.app test.mobileprovision "iPhone Developer: Dan Weeks (ABCDEF1234)" ABCDEFG my.bundle.id development
// 本番用、production用をご使用の場合、iTunesConnect へアップロードする際は以下のように使用してください。
example: $sh re-sign-notification.sh webgame.app test.mobileprovision "iPhone Distribution: Dan Weeks" ABCDEFG my.bundle.id production
上記コマンドの詳細説明
-
+ ダウンロードした .app ファイルのパスを入力します。 -
+ iOS Provisioning Portal からダウンロードした、拡張子が mobileprovision のファイルのパスを入力します。 -
+ iOS Provisioning Portal で登録した Distribution Certificates の証明書の通称を入力します。 -
+ iOS Provisioning Portal で App ID の登録時に自動的に作成される Bundle Seed ID (App ID Prefix) を入力します。iOS Provisioning Portal のApp IDs の Description に ”BundleSeedID”.”BundleID” という文字列がありますので、こちらの ”BundleSeedID” のみを入力してください。 -
+ 上記の ”BundleID” のみを入力します。 - <environment: development or production>
- 開発用の場合developmentを指定し、本番用の場合production を指定します。
実機で確認する
2つの実機と、2つのテストアカウントを用意してください。クライアントのアプリを両方の端末にインストールし、また、それぞれ別々のアカウントでログインします。その後、片方の端末は、アプリケーションを終了しておきます。
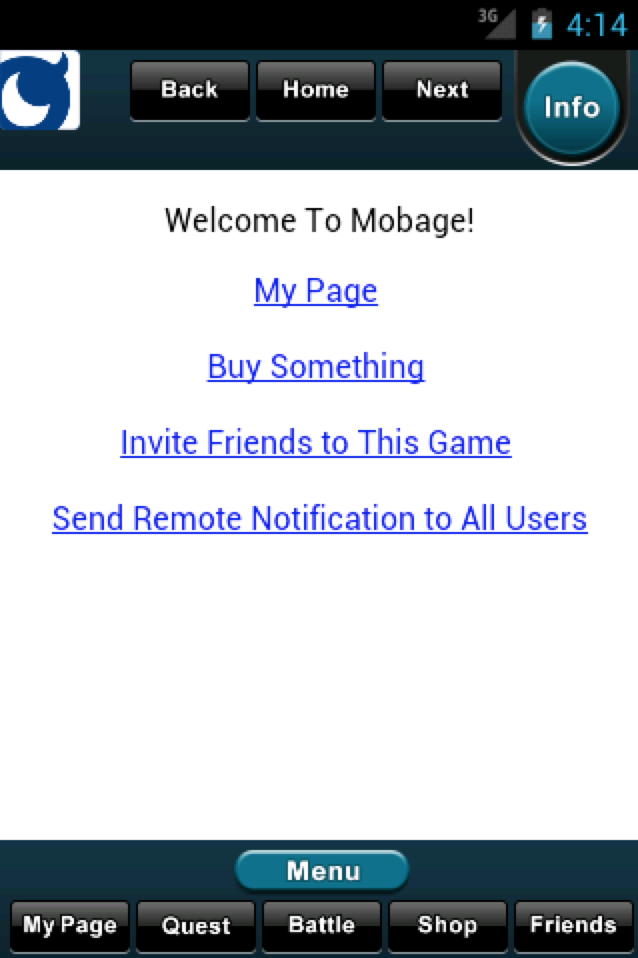
起動しているほうの端末で、Send Remote Notification to All Users のリンクをクリックして、RemoteNotificaion を送信します。
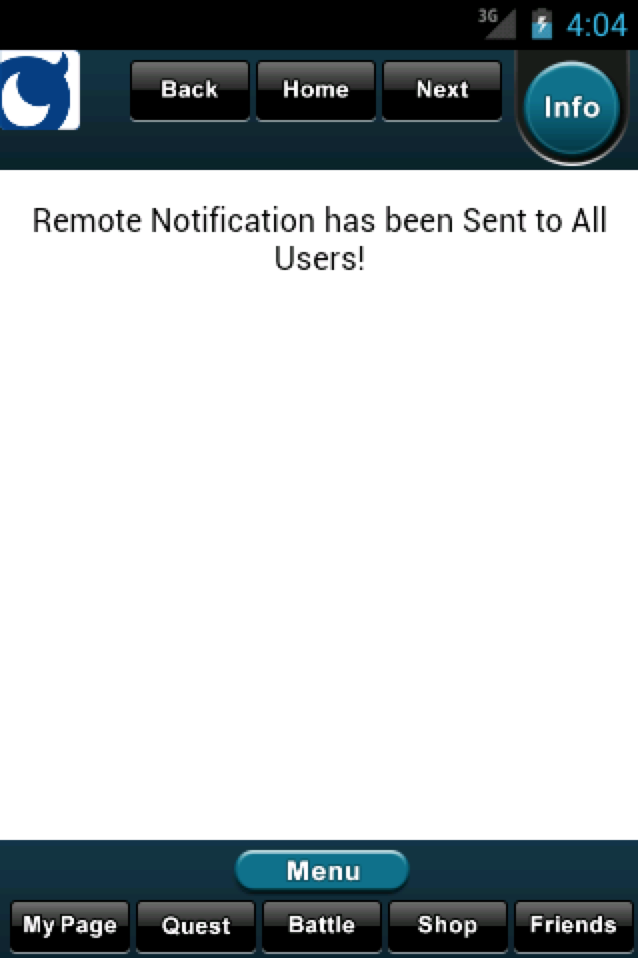
これで送信が完了しましたので、次は通知を受け取るところの動作確認をしていきます。
送信を行った端末は、アプリケーションがフォアグラウンドにある状態ですので、既に通知が届いている状態になっています。ヘッダーの Home ボタンを押して index.html へ遷移して、通知の内容を受け取ることができます。
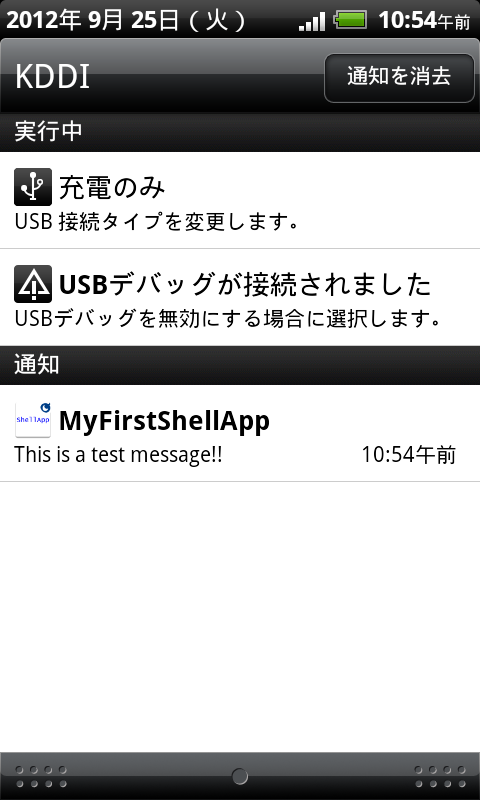
また、アプリケーションを終了しておいたほうの端末は、アプリケーションが起動していないため、通知バーに通知が来ている状態になっています。
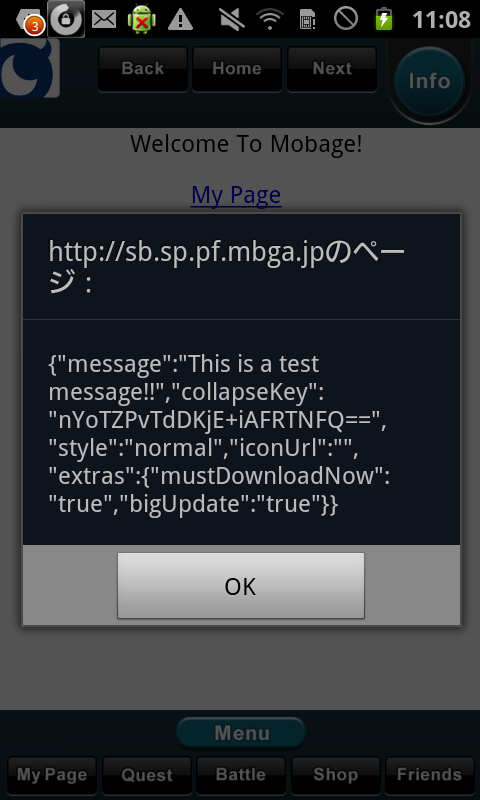
通知バーの通知をクリックして、アプリケーションを起動すると、先ほどと同じように index.htmlで受け取ることができます。
また、アプリケーションは起動しているが、バックグラウンド状態の場合は、通知バーに通知が来ている状態になり、通知をクリックするとアプリケーションがレジュームします。レジュームした段階では、WebView内のページがロードされないため、通知を受け取ることができません。次のページに遷移した場合、もしくは現在のページを再読み込みした際に、mobage.shellapp.Remote Notification.getPayload 関数で通知内容を取得することができます。
最後に、どちらかの端末で、再度 Send Remote Notification to All Users のリンクをクリックして、RemoteNotificaion を送信してください。
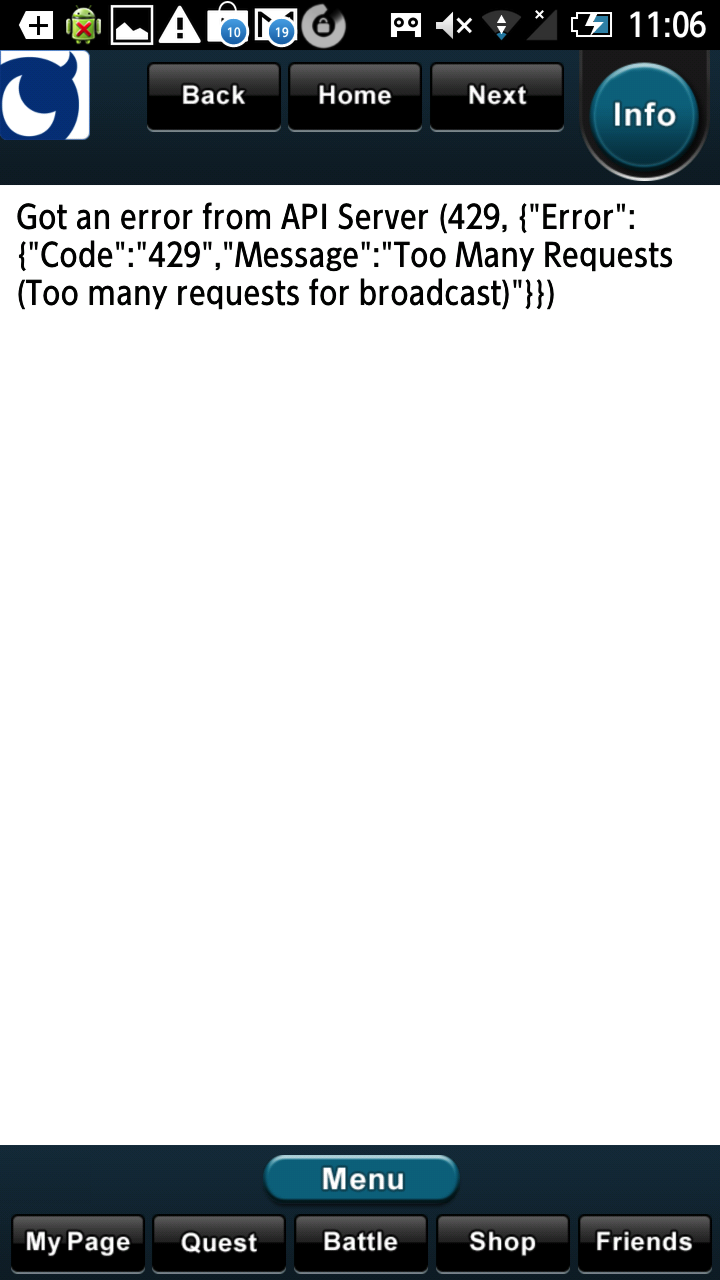
Game to All Users の送信は、4時間に一回という制限があるため、429 Too May Requests のエラーになります。4時間後に再実施すると問題なく送信できますが、これだと開発効率が悪いため、Sandboxに関しては、デベロッパーサイト上の「Remote Notification」のサブメニューである「送信制限確認」から解除することができます。
以上で、 Remote Notification を送信するチュートリアルは完了です。
補足情報
リモート通知が送信される端末について
リモート通知が送信される端末は、以下の様なルールに基づいています。
- Mobage へのログイン時に Mobage の UserId と端末の DeviceId が紐付き、端末へのリモート通知が送信可能な状態となります。
- Mobage からログアウトすると、UserId と端末の DeviceId が紐付いた情報は削除され、端末へのリモート通知は送信不可能な状態となります。
- 同じ UserId を用いて複数端末でログインしているような場合、最後にアプリを起動した端末にリモート通知が送られるようになります。ログアウト時の挙動は、Android 端末でログアウトした場合には Android 端末、iOS 端末でログアウトした場合には iOS 端末でリモート通知が送信されなくなります。
Game to User
Game to User のリモート通知の送信方法について説明します。
2-legged での OAuth Reqeust (Consumer Request) を行なってください。具体的には以下のように POST します。User への送信とアプリをインストールしているUserへの一斉配信が可能です。
User への送信: RESTful API 2-legged OAuth Reqeust (Consumer Request)
POST /social/api/restful/v2/remote_notification/@app/@all/{recipientId}
POST /social/api/restful/v2/remote_notification/@app/@all/10258
Content-Type: application/json; charset=utf-8
Authorization: OAuth realm="", oauth_consumer_key="31816a6d9beac8c11bc5", oauth_nonce="5f5ae6a5688795cab25d", oauth_signature="tuLm4o%2FvwzdQK%2FuWAGii9ab3ZiI%3D", oauth_signature_method="HMAC-SHA1", oauth_timestamp="1331798463", oauth_version="1.0"

{
    "payload" : {
        "message": "Simon! Come join my quest.",
        "extras": {
            "foo": "1",
            "bar": "twenty one!"
        }
    }
}

201 Created
Game to All User (全 User への送信): RESTful API 2-legged OAuth Reqeust (Consumer Request)
POST /social/api/restful/v2/remote_notification/@app/@all
POST /social/api/restful/v2/remote_notification/@app/@all
Content-Type: application/json; charset=utf-8
Authorization: OAuth realm="", oauth_consumer_key="31816a6d9beac8c11bc5", oauth_nonce="5f5ae6a5688795cab25d", oauth_signature="tuLm4o%2FvwzdQK%2FuWAGii9ab3ZiI%3D", oauth_signature_method="HMAC-SHA1", oauth_timestamp="1331798463", oauth_version="1.0"

{
    "payload" : {
        "message": "Simon! Come join my quest.",
        "extras": {
            "foo": "1",
            "bar": "twenty one!"
        }
    }
}

202 Accepted
Game to Multiple User (複数ユーザーへの送信): RESTful API 2-legged OAuth Reqeust (Consumer Request)
POST /social/api/restful/v2/remote_notification/@app/@all
POST /social/api/restful/v2/remote_notifications/@app/@all
Content-Type: application/json; charset=utf-8
Authorization: OAuth realm="", oauth_consumer_key="31816a6d9beac8c11bc5", oauth_nonce="5f5ae6a5688795cab25d", oauth_signature="tuLm4o%2FvwzdQK%2FuWAGii9ab3ZiI%3D", oauth_signature_method="HMAC-SHA1", oauth_timestamp="1331798463", oauth_version="1.0"

{
  "recipentId": ["10000", "10001", "10002"],
  "payload": {
    "message": "A New update is available.  Please download now!",
    "extras": {
            "foo": "1",
            "bar": "twenty one!"
    }
  }
}


202 Accepted
Content-Type: application/json; charset=utf-8

{
   "published" : "2013-09-17T06:55:53",
   "payload" : {
      "extras" : {
            "foo": "1",
            "bar": "twenty one!"
      },
      "message" : "A New update is available.  Please download now!"
   },
   "groupId" : "@all",
   "recipientId" : [
      "sb.mbga.jp:10000",
      "sb.mbga.jp:10001",
      "sb.mbga.jp:10002"
   ]
}
- 制限事項
- Game to User の場合、4時間に1度しかリモート通知ができません。もし制限を超えた場合には、 429 Too Many Requests が返却されます。
- 上記制限について、User 個人と全 User と別々に4時間に1度使用できます。言い換えると、Gameからは User 個人宛に個人毎に1日6通の通知と、全User宛に1日6通の通知をそれぞれ送ることができます。
デバイストークンの登録状態確認機能について
リモート通知機能は、SDK がスマートフォン端末毎にデバイストークンを取得し、プラットフォーム側に登録することで該当のアプリを遊んでいる端末を特定し、リモート通知を送ることができます。デバイストークンの登録状態確認機能は、デバイストークンが既にプラットフォームに登録されているかどうかを確認することができます。デバイストークンは以下のケースで登録されたり削除されたりします。一度に登録されるデバイストークンの数は Android 端末、iOS 端末で それぞれ 1 端末分のみです。
- デバイストークンがプラットフォームに登録されるタイミング
- アプリへのログイン時に登録されます。
- 既にログインしている場合、アプリ起動時に毎回登録されます。
- デバイストークンがプラットフォームから削除されるタイミング
- アプリからログアウトした場合に削除されます。
デバイストークンの登録状態確認機能の仕様
デバイストークンの登録状態確認機能の詳細は以下になります。
-
リクエスト形式
GET /social/api/restful/v2/remote_notification/@app/@all/{userId}/state -
URI Template パラメータ
- userId
-
userId パラメータは下記のいずれかの値を指定します。
値 説明 型 備考 {userId} ユーザー ID string or array 必須
-
- userId
-
指定できるクエリパラメータ
-
fields
Field Name Type Description userId String ユーザー ID enabled Boolean デバイストークンの登録有無(true/false) appId String アプリ ID updated Date デバイストークンの登録状態の最終更新日 (YYYY-MM-DDThh:mm:ss)
-
サンプル
1 User のデバイストークンの登録状態を確認する
-
リクエスト例
GET /social/api/restful/v2/remote_notification/@app/@all/10001/state?fields=appId,updated -
レスポンス例
200 OKContent-Type: application/json{"userId": "10001","enabled": true,"appId": "120XXXXX","updated": "2013-06-05T12:00:00"} -
1 User で指定した場合のレスポンス形式
Field Name Type Description userId String ユーザー ID enabled Boolean デバイストークンの登録有無(true/false) appId String アプリ ID updated Date デバイストークンの登録状態の最終更新日 (YYYY-MM-DDThh:mm:ss)
複数 User のデバイストークンの登録状態を確認する
-
リクエスト例
GET /social/api/restful/v2/remote_notification/@app/@all/10001,10002,10003/state?fields=appId,updated -
レスポンス例
200 OKContent-Type: application/json{"entry": [{ "userId": "10001", "enabled": true },{ "userId": "10002", "enabled": false },{ "userId": "10003", "enabled": true }],"itemsPerPage": 3,"totalResults": 3,"startIndex": 1} -
複数 User 指定した場合のレスポンス形式
Field Name Type Description entry Array entry[].userId string ユーザー ID entry[].enabled string デバイストークンの登録有無(true/false) entry[].appId string アプリ ID entry[].updated string デバイストークンの登録状態の最終更新日 (YYYY-MM-DDThh:mm:ss) totalResults Integer 総エントリ数 itemsPerPage Integer ページ当たりのエントリ数 (必ず件数と同じ値が返ります) startIndex Integer 開始インデックス値 (常に 1 を返します) 注意
1000 件以上のリクエストを送っても常に 1000 件までのレスポンスが返ります :::
参考資料
JavaScriptのgetPayloadの詳細はこちらを参照してください。
更新履歴
- 2018/11/28
- Shell App Framework 1.3.0 より必要となった、リモート通知用アイコンファイルの追加方法を追記
- 2014/03/19
- Grade 1 ユーザーでも User to User が利用になったので追記
- 2013/11/14
- GCMについて追記
- 2013/10/03
- 補足情報の項目を追加
- 補足情報内に以下の情報を記載
- Game to Multiple User (複数ユーザーへの送信): RESTful API 2-legged OAuth Reqeust (Consumer Request)
- デバイストークンの登録状態確認機能について
- 2012/12/11
- 新規作成