4章 ログインユーザー情報を取得する
本チュートリアルで作成するサンプルコードは Native Tutorial Sample Download からダウンロードできます。
で 3-legged 認証まで行いました。本章では 3-legged 認証 で取得した Token Credential を使用して Game Server でログインしたユーザーの情報の取得を行います。
クライアントから Game Server にログインユーザー情報取得を要求する
クライアントアプリケーションから Game Server にログインユーザー情報取得リクエストを送信します。
ex) http://GameServer.jp/GameSever/PHP/People/getCurrentUser.php
Android/iOS で HTTP のリクエストを送信するにはそれぞれ下記のように実装します。
クリックすると該当処理を行うコードが表示されます...
Android
// response handler
ResponseHandler<Void> handler = new ResponseHandler<Void>() {
	@Override
	public Void handleResponse(HttpResponse response) {
		// レスポンスを処理
		return null;
	}
};

// make post request instance.
HttpPost postRequest = new HttpPost("http://GameServer.jp/GameSever/PHP/People/getCurrentUser.php");
HttpUriRequest request = postRequest;

// send request
try {
    HttpClient httpClient = new DefaultHttpClient();
    httpClient.execute(request, handler);
} catch (ClientProtocolException e) {
     e.printStackTrace();
} catch (IOException e) {
     e.printStackTrace();
}
iOS
typedef void (^GSCCompletionHandler)(NSURLResponse *res, NSData *data, NSError *error);
// response handler
GSCCompletionHandler hander = ^(NSURLResponse *res,
                                NSData *data,
                                NSError *error) {
    // レスポンスを処理
};

// make post request instance.
NSURL *url = [NSURL urlWithString:@"http://GameServer.jp/GameSever/PHP/People/getCurrentUser.php"];
NSMutableURLRequest *request = [NSMutableURLRequest requestWithURL:];
[request setHTTPMethod:@"POST"];
[request setValue:@"application/x-www-form-urlencoded" forHTTPHeaderField:@"Content-Type"];
[request setValue:[NSString stringWithFormat:@"%d", [requestBody length]] forHTTPHeaderField:@"Content-Length"];

// send request
[NSURLConnection sendAsynchronousRequest:request
                                   queue:[NSOperationQueue mainQueue]
                       completionHandler:handler];
Platform へ Token Credential を使用してログインユーザー情報取得を要求しクライアントに返す
クライアントアプリケーションからログインユーザー情報取得リクエストを受信したら Game Server は Mobage Platform のユーザー情報取得用の End point へリクエストを行います。
End point
  http://sb.sp.mbga-platform.jp/social/api/restful/v2/people/@me/@self
@me は 3-legged 認証済みでないと使用することができません。また、@me となっている箇所にユーザーのID を設定する事で同様の処理を行う事ができますが、その場合クライアントアプリケーションからログインしているユーザーの ID を取得する必要が有ります。その場合クライアントアプリケーションから送信されるユーザーIDを改ざんされてしまう危険性が伴いますのでご注意ください。
Platform へのリクエストとレスポンスは下記のようになります。
HTTPS Request
Platform へリクエストを送る際には
- REST_CONSUMER_KEY
- REST_CONSUMER_SECRET
- oauth_token
- oauth_token_secret
と OAuth.php を利用して Authorization header を作成する必要があります。 Authorization header のサンプルは下記をご参考ください。
GET /social/api/restful/v2/people/@me/@self HTTP/1.1
Accept: */*
Authorization: OAuth oauth_version="1.0",oauth_nonce="ac80ab8e69a92d84fde6e2ebefe92846",oauth_timestamp="1381112291",oauth_consumer_key="c8bb6e04c60b9f6c0063",oauth_token="sp_client_id%3Aabd1d89e072bf6104c5b77569585a55b",oauth_signature_method="HMAC-SHA1",oauth_signature="Vo73j%2F6BujQu%2FEV%2Btw9ApGZIhNU%3D"
また、ユーザー情報の取得を行う際には取得する情報を取捨選択する為に fields のパラメーターを設定します。
ex) fields=displayName,grade,age
fields に設定できる値は下記ドキュメントをご参考ください。
クリックすると該当処理を行うコードが表示されます...
Game Server
Game Server から Platform へのリクエストを作成して送信する処理の実装はこのようになります。
// Endpoint of People API
$endpoint_url = $config->getValue("RestConfig", "SocialAPIBaseURI") ."/people/@me/@self";

// セッションから 3-legged 認証の際に保存した Token Credential 等を取得する
$oauth_token = $_SESSION['oauth_token'];
$oauth_token_secret = $_SESSION['oauth_token_secret'];

// 取得する情報を制御
if(isset($_REQUEST['fields'])){
	$fields = @$_REQUEST['fields'];
	$endpoint_url = $endpoint_url . "?fields=" . $fields;
}

// Signature method
$sig_method = new OAuthSignatureMethod_HMAC_SHA1();

// Consumer
$consumer = new OAuthConsumer($consumer_key, $consumer_secret, NULL);

// Token
$token = new OAuthToken($oauth_token , $oauth_token_secret);

// Generate Authentication Header
$action ="GET";
$request = OAuthRequest::from_consumer_and_token($consumer, $token, $action , $endpoint_url, NULL);
$request->sign_request($sig_method, $consumer, $token);
$auth_header = $request->to_header("");

// Access to platform server
$curl = curl_init($endpoint_url);
curl_setopt($curl, CURLOPT_RETURNTRANSFER, true);
curl_setopt($curl, CURLOPT_FAILONERROR, false);
curl_setopt($curl, CURLOPT_ENCODING , "gzip");
curl_setopt($curl, CURLOPT_HTTPHEADER, array($auth_header, "Content-Type: application/json; charset=utf8"));
:
:
HTTPS Response
HTTP/1.1 200 OK
Content-Type: application/json; charset=utf-8

{
  "displayName": "てすと",
  "grade": 3,
  "id": "sb.mobage.jp:12345",
  "nickname": "てすと"
}
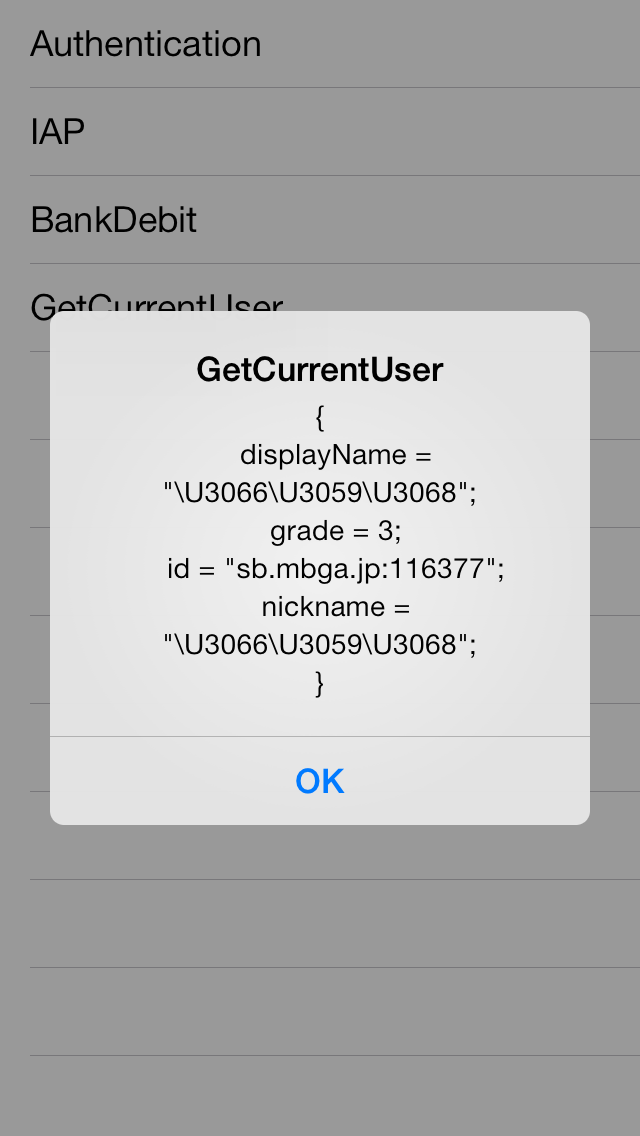
id に sb.mobage.jp: のような値が付与されておりますがこれは Sandbox ユーザー、Production ユーザー、ユーザーのリージョン等を区別する為に付与されております。
取得したユーザー情報をクライアントアプリケーションに返します。
クリックすると該当処理を行うコードが表示されます...
Game Server
Platform からのレスポンスをクライアントアプリケーションへ返却する処理の実装はこのようになります。
:
:

// Platform からのレスポンスを取得
$response = curl_exec($curl);
$statusCode = curl_getinfo($curl, CURLINFO_HTTP_CODE);

curl_close($curl);

$json = json_decode($response);
$decoded_response = OAuthUtil::urldecode_rfc3986($response);
$parsed_parameters = OAuthUtil::parse_parameters($decoded_response);

// レスポンスの header を設定
header('status: ' . $statusCode);
header('Content-type: application/json; charset=utf8');

// JSON 形式でクライアントへ返す
switch ($statusCode) {
	case 200: // OK.
		$arr = array(
		    'statusCode' => $statusCode,
            'userData' => $json,
        );
		$result = json_encode($arr);
		break;
	case 400: // Bad Request
	case 401: // Unauthorized
	case 403: // Forbidden
	case 404: // Not Found
	case 500: // internal Server Error
	case 503: // Service Unavailable
	default:
		$arr = array(
			'statusCode' => $statusCode,
			'error' => $json->{'Error'},
		);
		$result = json_encode($arr);
		break;
}
print($result);
取得したユーザー情報を表示する
3-legged 認証を行うと、このような手順で Game Server を使用してログインしているユーザーの情報を取得する事ができます。最後に取得した情報を表示するコードを記述します。Android / iOS の各 handler を下記のように書き換えます。
Android
// response handler
ResponseHandler<Void> handler = new ResponseHandler<Void>() {
	@Override
	public Void handleResponse(HttpResponse response) {
		// レスポンスを処理
		try {
			ByteArrayOutputStream outputStream = new ByteArrayOutputStream();
			response.getEntity().writeTo(outputStream);
			String data = outputStream.toString();

			AlertDialog.Builder ab = new AlertDialog.Builder(MainActivity.this);
			AlertDialog ad = ab.create();
			ad.setTitle("GetCurrentUser");
			ad.setMessage(data);
			ad.show();
		} catch (Exception e) {
			e.printStackTrace();
		}

		return null;
	}
};
iOS
typedef void (^GSCCompletionHandler)(NSURLResponse *res, NSData *data, NSError *error);
// response handler
GSCCompletionHandler hander = ^(NSURLResponse *res,
                                NSData *data,
                                NSError *error) {
    // レスポンスを処理
    NSString *data = [[[NSString alloc] initWithData:data encoding:NSUTF8StringEncoding] autorelease];
    UIAlertView *alert = [[UIAlertView alloc] initWithTitle:@"GetCurrentUser"
                                                    message:data
                                                   delegate:nil
                                          cancelButtonTitle:nil
                                          otherButtonTitles:@"OK", nil];
    [alert show];
    [alert release];
};
更新履歴
- 2013/12/04
- 初版作成