Mobage Unity SDK(iOS)快速指南
Mobage Unity SDK(iOS)概要
Mobage Unity SDK是Mobage为Unity3D定制的一个插件,主要功能是在Unity3D制作游戏中可以通过C#语言调用Mobage的一些Social API,其中包括获得好友列表,用户信息或者用户支付等。
开发环境
PC: MacOS X 10.8
Unity3D Pro 3.4.0
XCode 4.6
iOS SDK 5.1
文件结构
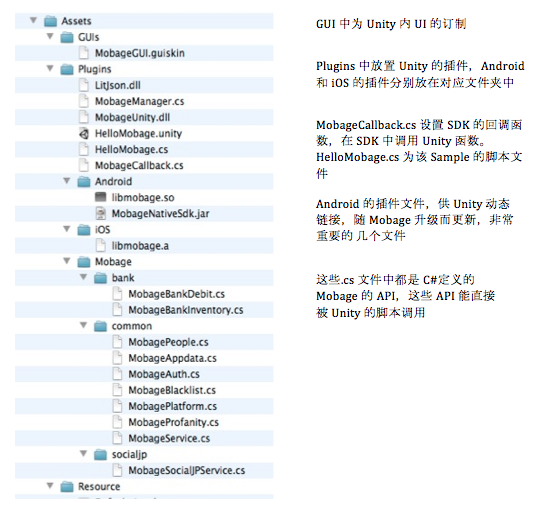
Mobage Unity SDK(iOS)安装
Unity3D IDE环境设定
1.打开Unity3D IDE,选择Assets->Import Package-> Custom Package…导入MobageUnitySDK.unitypackage. 如下
(如果曾接入过 MobageUnitySDK,请先删除旧版SDK)
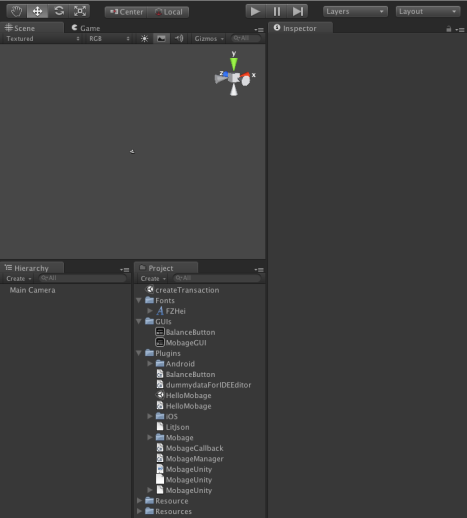
2.选择GameObject->CreateEmpty,并在inspector中重命名为MobageCallback,接收从iOS返回的消息。
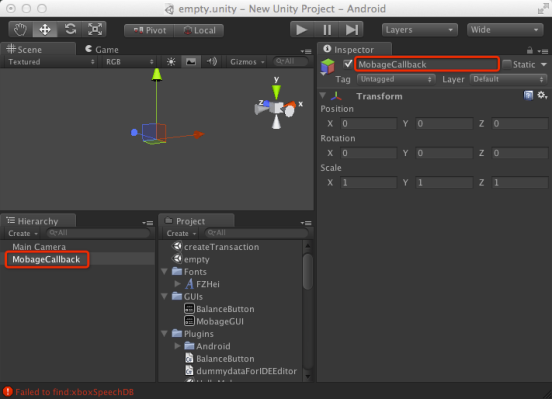
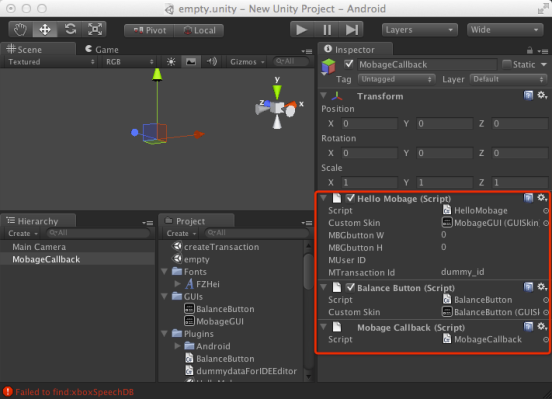
3.在Hierarchy下配置MobageCallback, ,绑定脚本和对应的GUISkin.
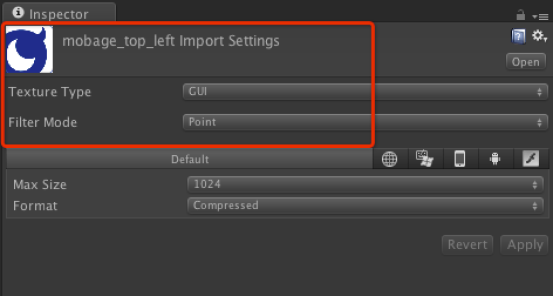
4.设置Mobage_top_left图片参数如下图。
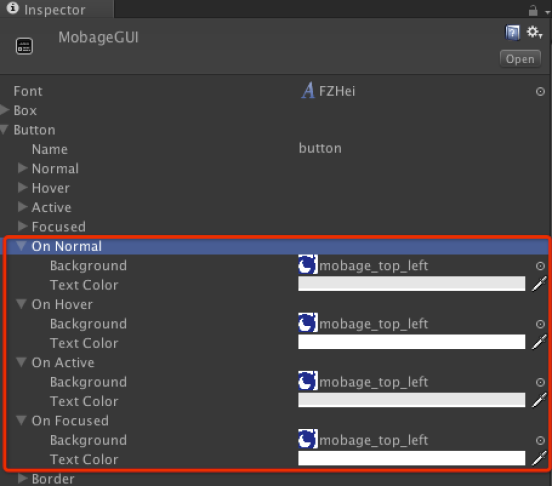
5.设置MobageGUI的参数如下图。
Unity3D IDE的build设置
1.在HelloMobage.cs文件中设置consumerKey, consumerSecret, appId,需要到Mobage注册得到。
#if UNITY_IPHONE
 print(">< Awake ><");
int region = (int)MBG_REGION.MBG_REGION_CN;
int serverMode;

string consumerKey; //consumerKey, you can get it from DeNA
string consumerSecret; //consumerSecret, you can get it from DeNA
string appId; //appId, you can get it from DeNA

if(MobageCNService.isProductionMode()) { // Production environment
 serverMode = (int)MBG_SERVER_TYPE.MBG_PRODUCTION;
 consumerKey = "sdk_app_id:13000057";
 consumerSecret = "893a0ace96b5654a8492eb4ee15c404a";
 appId = "13000057";
 }
else { // Sandbox environment
 serverMode = (int)MBG_SERVER_TYPE.MBG_SANDBOX;
 consumerKey = "sdk_app_id:13000057";
 consumerSecret = "a08e2b8d7e70b26223cff0982f7e8dc1";
 appId = "13000057";
 }

 MobagePlatform.Initialize(region, serverMode, consumerKey, consumerSecret, appId);
 MobageManager.registerTick();
 MobageManager.checkLoginStatus();
#endif
2.选择File->Build Setting… ,点击iOS然后选择Switch Platform,点击Add Current
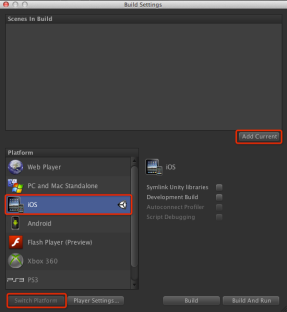 3.点击 Player Setting…在右边View中配置如下图 。
Bundle Identifier 设置成:
大陆区 cn.mobage.g+YourAppId(默认测试AppId是13000057)
台湾区 tw.mobage.g+YourAppId(默认测试AppId是23000013)
TargetPlatform 设置成armv7
Stripping Level 设置成Disabled
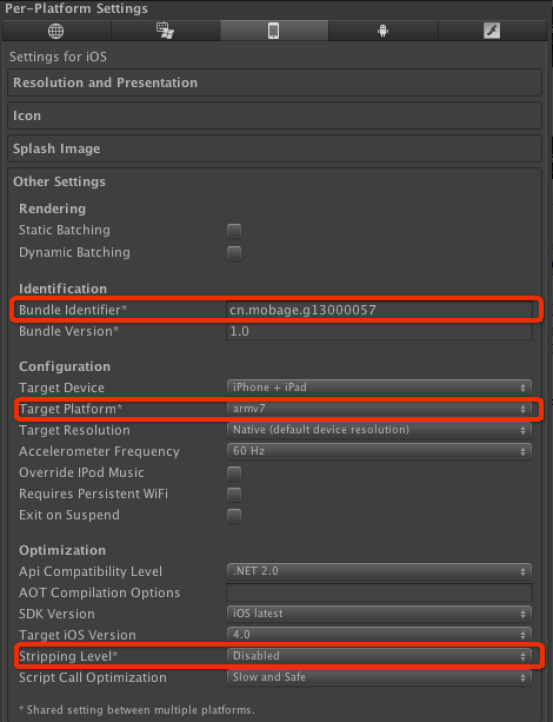 4.点击Build and Run,Unity3D会自动打开XCode,接下去的操作将在XCode中完成。
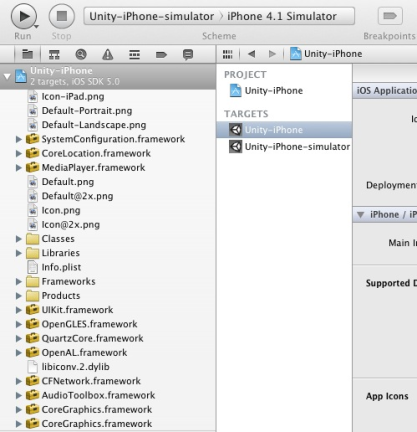
Xcode环境设定
1.右键点击工程文件,选择Add File to Unity-iPhone,添加MobageSDKforiOS目录,添加后如下图。
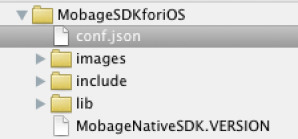 并请编辑conf.json文件来制定游戏运行环境和appId。
| {"platformEnv":"SANDBOX", "app_id":"13000057", "affcode":"1980000000"} |
2.因为Mobage SDK中存在支付业务,所以需要在工程中添加StoreKit.framework, 步骤为点击Unity-iPhone的Target->选择BuildPhases->LinkBinaryWithLibraries->添加StoreKit.framework。
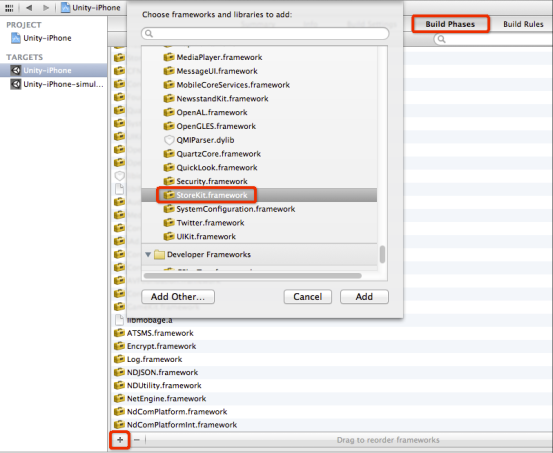
同样的方法添加以下frameworks:
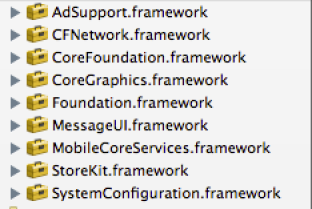
3.参数设置
a. 切换到Unity-IPhone的BuildSettings配置窗口.在Build Settings中切换Basic到All,找到Linking->Other Linker Flags,在Debug和Release中添加-ObjC的Flag。
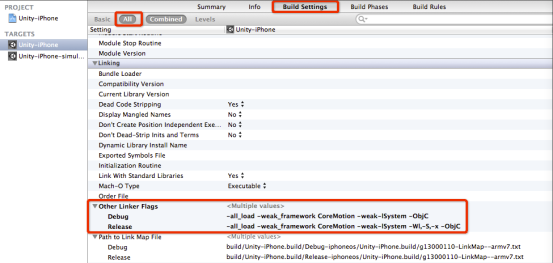
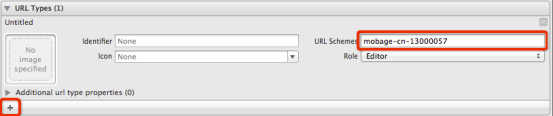
b. 切换到Unity-iPhone的Info配置窗口
添加URL Type.设置URL Schemes为:
大陆区mobage-cn-appid
台湾区 mobage-tw-appid
4.在生成的xcode工程中,修改AppController.mm文件。
(此处可参考sample)
a.添加头文件
#import "MBGPlatform.h"
#import "MobageDashboardViewController.h"
修改UnityViewController定义
@interface UnityViewController : UIViewController<MobageDashboardDelegate> {}
@end
在方法int OpenEAGL_UnityCallback(UIWindow** window, int* screenWidth, int* screenHeight, int* openglesVersion) 末尾添加如下代码。
_window.rootViewController = controller;
 [[MBGPlatform sharedPlatform] setDelegate:nil withWindow:_window withRootViewController:controller];
 [MobageDashboardViewController shareInstance].delegate = controller;
在UnityViewController中添加方法
onMBGCNCommunityLaunched和onMBGCNCommunityDismiss
-(void)onMBGCNCommunityLaunched
 {
 UnityPause(true);
 [_displayLink setPaused: YES];
 }
 -(void)onMBGCNCommunityDismiss;
 {
 UnityPause(false);
 [_displayLink setPaused: NO];
 }
b.在方法(void)applicationDidEnterBackground:
(UIApplication*)application
末尾添加如下代码。
[MBGPlatform pause];
c.在方法(void)applicationWillEnterForeground:
(UIApplication *)application
末尾添加如下代码。
[MBGPlatform resume];
5.如果使用Remote Notification功能,请添加如下代码
a.添加头文件
#import "MobageNotificationQueue.h"
b. 由于使用了 Apple Push Notification Service,在 Appdelegate 中,我们要处理 push notification 的回调,示例代码如下:
(void)applicationUIApplication)application didReceiveRemoteNotificationNSDictionary)userInfo
 {
NSLog(@"userinfo %@",userInfo);
NSArray *keys = [userInfo allKeys];
for(NSString *key in keys)
 {
NSLog(@"key %@ %@",key, [userInfo objectForKey:key]);
 }
NSString *message = nil;
id alert = [userInfo objectForKey:@"aps"];
if ([alert isKindOfClass:[NSDictionary class]])
 {
 message = [alert objectForKey:@"alert"];
 }
NSString *url = nil;
id x = [userInfo objectForKey:@"x"];
if ([x isKindOfClass:[NSArray class]])
 {
for(id tmp in x)
 {
if([tmp isKindOfClass: [NSDictionary class]])
 {
 url = [tmp objectForKey:@"_mUrl"];
NSLog(@"url: %@",url);
 }
 }
 }
if(url!=nil && url.length > 0)
 {
 [[MobageNotificationQueue shareInstance] performSelector:@selector(generateNotificationWithText:openUrl withObject:message withObject:url];
 }
else if(message != nil)
 {
 [[MobageNotificationQueue shareInstance] performSelector:@selector(generateNotificationWithText withObject:message];
 }
……
 }

(void)applicationUIApplication)application didRegisterForRemoteNotificationsWithDeviceTokenNSData)deviceToken{
 [MBGPlatform registerForRemoteNotification:deviceToken];
 ……
 }

(void)applicationUIApplication)application didFailToRegisterForRemoteNotificationsWithErrorNSError)error{
NSLog(@"MobageSDK :: FailToRegisterForRemoteNotificationsWithError:%@", error);
 ……
 }
c. 如果想通过 Apple Notification bar 启动程序,并且获取相关的 Remote Notification,需要在 didFinishLaunchingWithOptions 中加入相关的代 码,示例如下:
(BOOL)applicationUIApplication)application didFinishLaunchingWithOptionsNSDictionary)launchOptions
 {
 ……
if(nil != launchOptions)
 {
NSDictionary* userInfo = [launchOptions objectForKey:UIApplicationLaunchOptionsRemoteNotificationKey];
if(nil != userInfo)
 {
NSLog(@"userinfo %@",userInfo); NSArray *keys = [userInfo allKeys];
for(NSString *key in keys)
 {
NSLog(@"key %@ %@",key, [userInfo objectForKey:key]);
 }
NSString *message = nil;
id alert = [userInfo objectForKey:@"aps"];
if ([alert isKindOfClass:[NSDictionary class]])
 {
 message = [alert objectForKey:@"alert"];
 }
NSString *url = nil;
id x = [userInfo objectForKey:@"x"];
if ([x isKindOfClass:[NSArray class]])
 {
for(id tmp in x)
 {
if([tmp isKindOfClass: [NSDictionary class]])
 {
 url = [tmp objectForKey:@"_mUrl"];
NSLog(@"url: %@",url);
 }
 }
 }
if(url!=nil && url.length > 0)
 {
 [[MobageNotificationQueue shareInstance] performSelector:@selector(generateNotificationWithText:openUrl withObject:message withObject:url];
 }
else if(message != nil)
 {
 [[MobageNotificationQueue shareInstance] performSelector:@selector(generateNotificationWithText withObject:message];
 }
 }
 }
 ……
 }
6.确保正确设置了iOS的Coding Signing证书,选择并且连接了iOS的Device编译并运行。
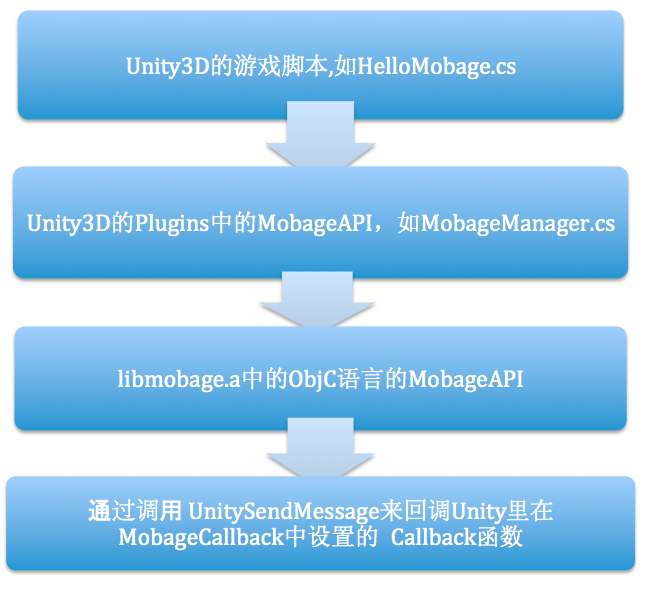
Mobage Unity SDK插件调用流程